
PDUs: Outlets, Load and Rail Mounting
Add PDUs to Inventory, read model, outlets and live load over SNMP, set rated capacity, and mount PDUs horizontally or on 0U side rails.
A PDU (power distribution unit) record in FluxBilling holds one power strip in your racks: what it is, how much power it is rated for, where it is mounted and how much power it is drawing right now. PDUs live in Inventory with your servers and network gear. FluxBilling reads them over SNMP to fill in the model, outlet count and live load, and the rack view uses that data to show the load on each PDU against its rated capacity.
This page is for the staff who look after your datacenter racks. Customers never see PDUs: no PDU field or screen appears in the client area.
Before you start
- Modules. PDUs are part of the Inventory module, and Inventory needs Locations. Both are switched on under Settings → General → Feature Toggles (see General settings).
- Permission. Staff need the View Inventory or Edit Inventory permission for their department (see Staff and permissions).
- For live data: SNMP turned on in the PDU's network management card (SNMPv2c with a community string, or SNMPv3 with a user), and a management IP address that FluxBilling can reach on UDP port 161. If the PDU sits on a private management network, install a local agent in that network. FluxBilling then sends the SNMP requests through the agent.
Where to find PDUs
Open Inventory in the sidebar and select the PDUs tab. Each row shows the PDU's name, type, location and datacenter, rack and U range, the last load reading in watts (or amps when the PDU reports no watts) with the number of outlets, and the status. To open a PDU, click its row.
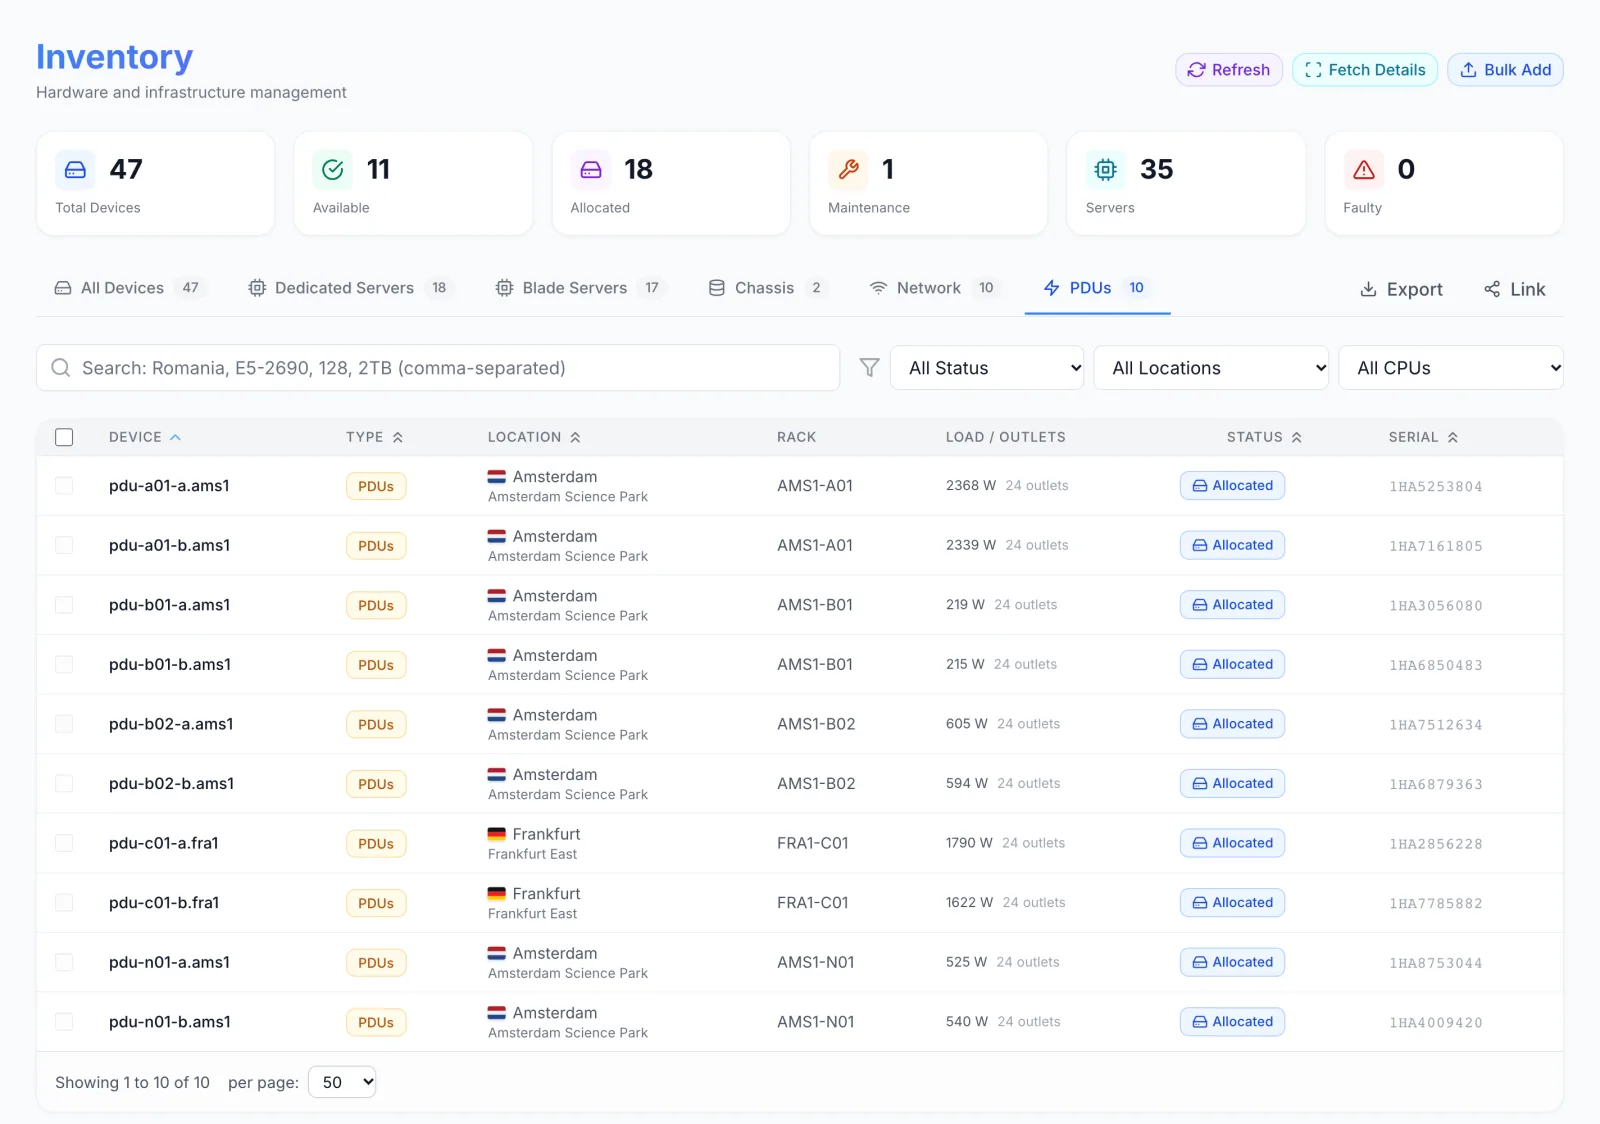
PDUs are rack equipment, not equipment you sell. They are left out of the counters at the top of Inventory (Available, Allocated, Maintenance, Faulty), but the PDUs tab shows its own count.
You can also open a PDU from the rack view: click its strip on a side rail or its block in the rack. The same PDU window opens. See Rack management.
Add PDUs
PDUs are added with Bulk Add, which handles one PDU or many at a time.
- In Inventory, click Bulk Add and choose PDUs.
- On Basic Info, enter a Name for each row. You can also enter the Model, the number of Outlets, the Rated kW and a Status. Rows without a name are ignored.
- On Asset Tracking, add the serial number, asset tag, purchase and warranty dates, and notes if you track them.
- On Management, enter the Management IP and choose the SNMP Version. For v2c, enter the community string. For v3, enter the username and auth password, and pick the auth and privacy protocols. To read the PDU straight away, click the fetch button on the row. FluxBilling fills in the model, manufacturer, firmware, outlet count and voltage it can read, and keeps the first load reading.
- On Location, choose the location, datacenter and rack, then the Mount: Horizontal (U), Left rail or Right rail. Enter the Start U (the bottom rack unit) and the Size (U).
- Save. A message confirms how many devices were added.
If you entered SNMP credentials and a management IP but did not use the fetch button, FluxBilling reads each new PDU in the background after it is saved. The message Fetching hardware details for N devices in background. Track in Automations. appears, and progress shows in the Automations menu.
One Bulk Add can create up to 100 devices. The rack view cannot create PDUs: it only places PDUs that already exist in Inventory. See Inventory for the general Bulk Add tools, such as templates and sequential names.
The PDU window
The window opens read-only. The header shows the PDU's name, manufacturer and model, then a row of chips: the status, the number of outlets, where it is mounted (or Not installed), and the current load. Below the header are four tabs: Overview, Power, SNMP and Location.
To change anything, click Edit. Every tab then becomes editable. Click Update Device to save the changes on all tabs at once, or Cancel to discard them. The name is required, and the save button stays disabled while the name is empty.
Overview
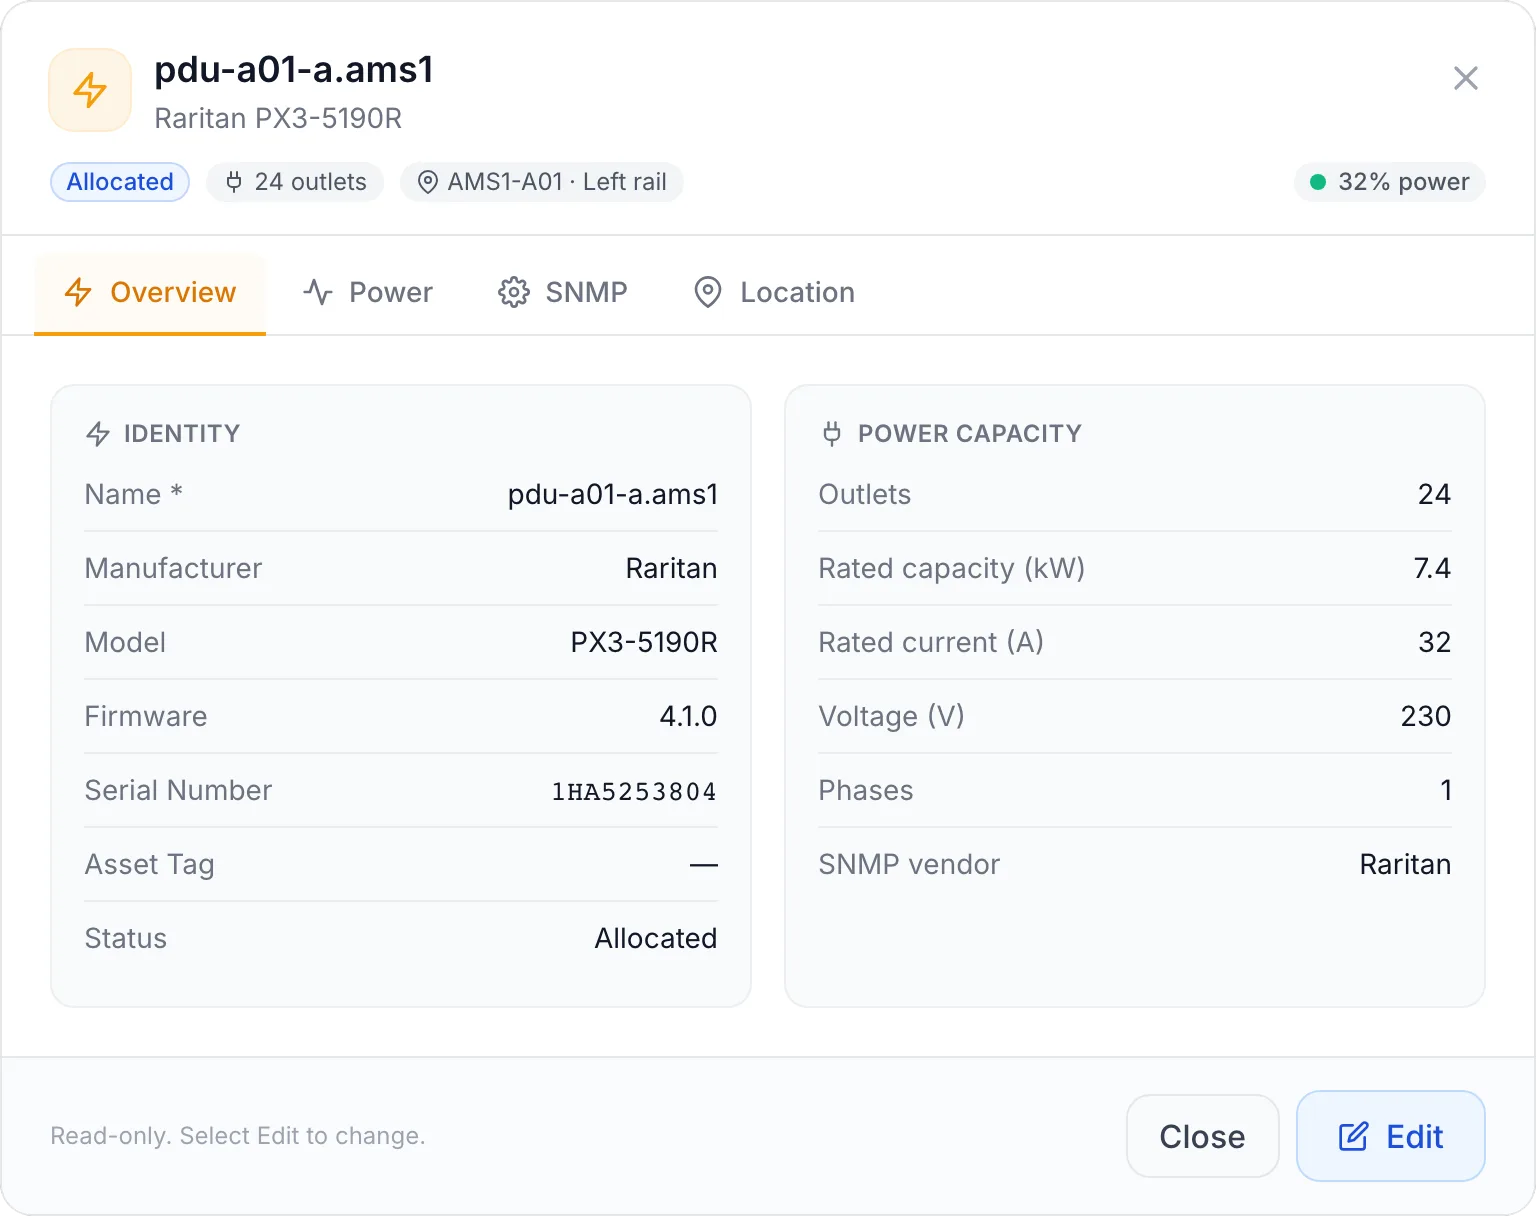
The Identity panel holds:
- Name — required.
- Manufacturer, Model, Firmware, Serial Number, Asset Tag.
- Status — available, reserved, maintenance, decommissioned or faulty. When a PDU is allocated, you cannot change its status here.
The Power capacity panel holds:
| Field | What it is for |
|---|---|
| Outlets | The number of outlets on the strip. Shown in the header chip and in the PDU list. |
| Rated capacity (kW) | The maximum power the PDU is rated for. Used to work out the load percentage. |
| Rated current (A) | The maximum current. Used for the load percentage when there is no rated kW or no watts reading, and for the per-phase bars. |
| Voltage (V) | The supply voltage, for your records. |
| Phases | The number of phases, for your records. |
| SNMP vendor | The brand FluxBilling recognised when it read the PDU. You can type it yourself. |
FluxBilling cannot read the rated capacity from the PDU. Take it from the PDU's datasheet or nameplate and enter it yourself. Without it, the load shows in watts or amps but there is no percentage.
Power
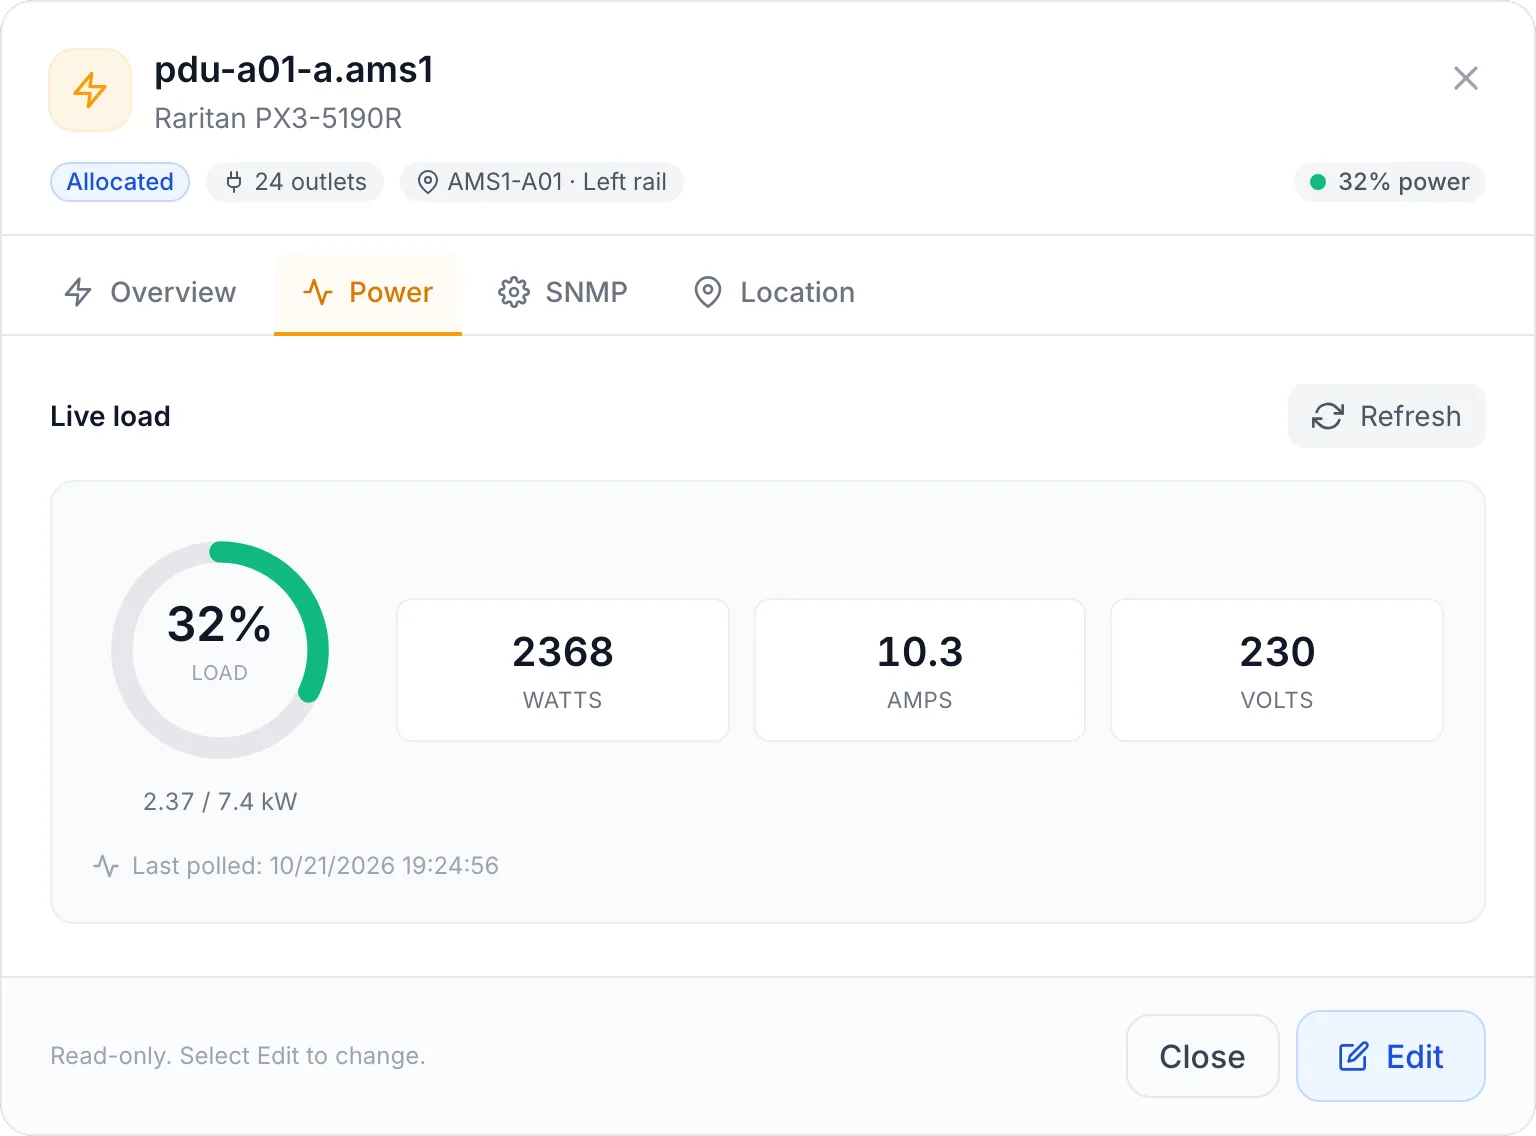
The Live load panel shows the last reading taken from the PDU:
- A load gauge with the percentage of rated capacity. FluxBilling compares the watts with Rated capacity (kW). When either is missing, it compares the amps with Rated current (A). When neither pair is available, the gauge reads Set rated capacity.
- Watts, Amps and Volts readings. The load the percentage is taken from, such as 2.37 / 7.4 kW, is shown under the gauge.
- Per-phase (A) — one bar per phase (L1, L2, L3) with its current, when the PDU reports more than one phase or inlet. Each bar is coloured against Rated current (A).
- Last polled — when the reading was taken.
The gauge, the bars and the rack view use the same colours: green up to 70% of capacity, yellow above 70%, red above 90%.
Click Refresh to read the PDU again. This works in view mode, uses the management IP and SNMP credentials already saved on the PDU, and saves the new reading, which the PDU list and the rack view then show. A PDU with no reading yet shows No load data yet. Configure SNMP and click Refresh.
When the PDU reports current but not power, the reading may show amps only. FluxBilling works out the watts from the current and the voltage for brands it reads through their own load table (see Which PDUs FluxBilling can read) and during scheduled polling, as long as it can read the voltage.
SNMP
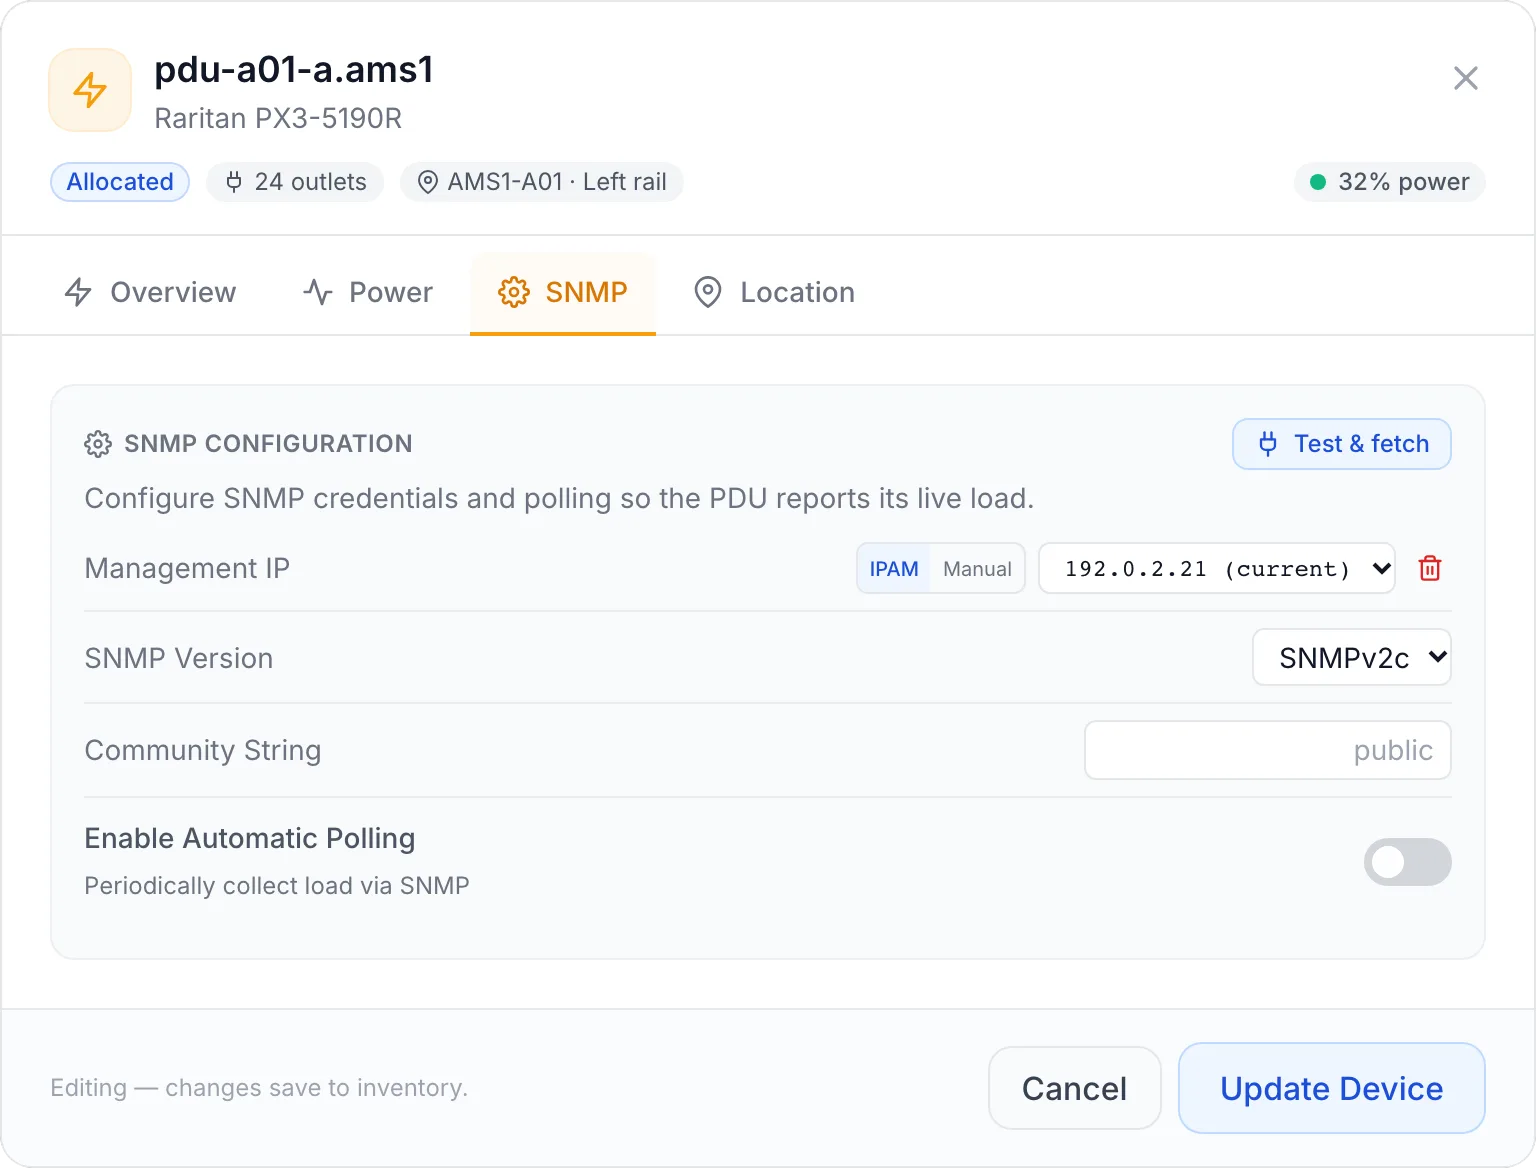
The SNMP Configuration panel holds the connection details:
- Management IP — the address of the PDU's network card. When IPAM is on, you pick the address from IPAM (IPAM) or type one (Manual), as for servers and switches; see IPAM. When IPAM is off, it is a plain text field.
- SNMP Version — SNMPv2c or SNMPv3.
- Community String (v2c). Once one is saved, the field shows (configured - leave blank to keep). Leave it empty to keep the saved value.
- Username, Auth Protocol (SHA or MD5) with its password, and Privacy Protocol (AES or DES) with its password (v3). Saved passwords are kept when you leave the fields empty.
- Enable Automatic Polling — adds the PDU to scheduled SNMP polling. A PDU with polling on and a management IP is listed as a monitored device in Monitoring.
Test & fetch checks that the PDU answers and reads its details. It uses the community string or v3 passwords typed on the SNMP tab. Super admins can leave those fields empty to use the saved credentials; other staff click Edit and type them again first. (Refresh and Fetch Details always use the saved credentials.) FluxBilling fills in the manufacturer and serial number if they are empty, updates the SNMP vendor, model, firmware and outlet count with what the PDU reports, and takes a load reading. A success message lists what it found, for example Connected — APC · AP8941 · 24 outlets.
- In view mode, the fetched details are saved straight away.
- In edit mode, they are only put in the form. Check them and click Update Device to keep them. The load reading is not saved from edit mode: click Refresh after saving to store a fresh reading.
Location
The Location tab sets where the PDU sits in a rack. A small rack drawing shows the mount you chose.
- Rack — any rack, listed with its datacenter, or Not installed.
- Mount — Horizontal (U) for a PDU that takes front rack units like any other device, or Left rail / Right rail for a vertical 0U PDU on the side of the rack.
- Start U — the lowest rack unit it occupies. For a rail PDU this field is called Bottom U.
- Size (U) — its height in rack units. For a rail PDU this is how much of the rail it covers.
A rail PDU mounts on the side rail over this U range — runs parallel to front gear, consumes no front U. It never conflicts with servers in the same units, and it is not counted in the rack's used space.
PDUs in the rack view
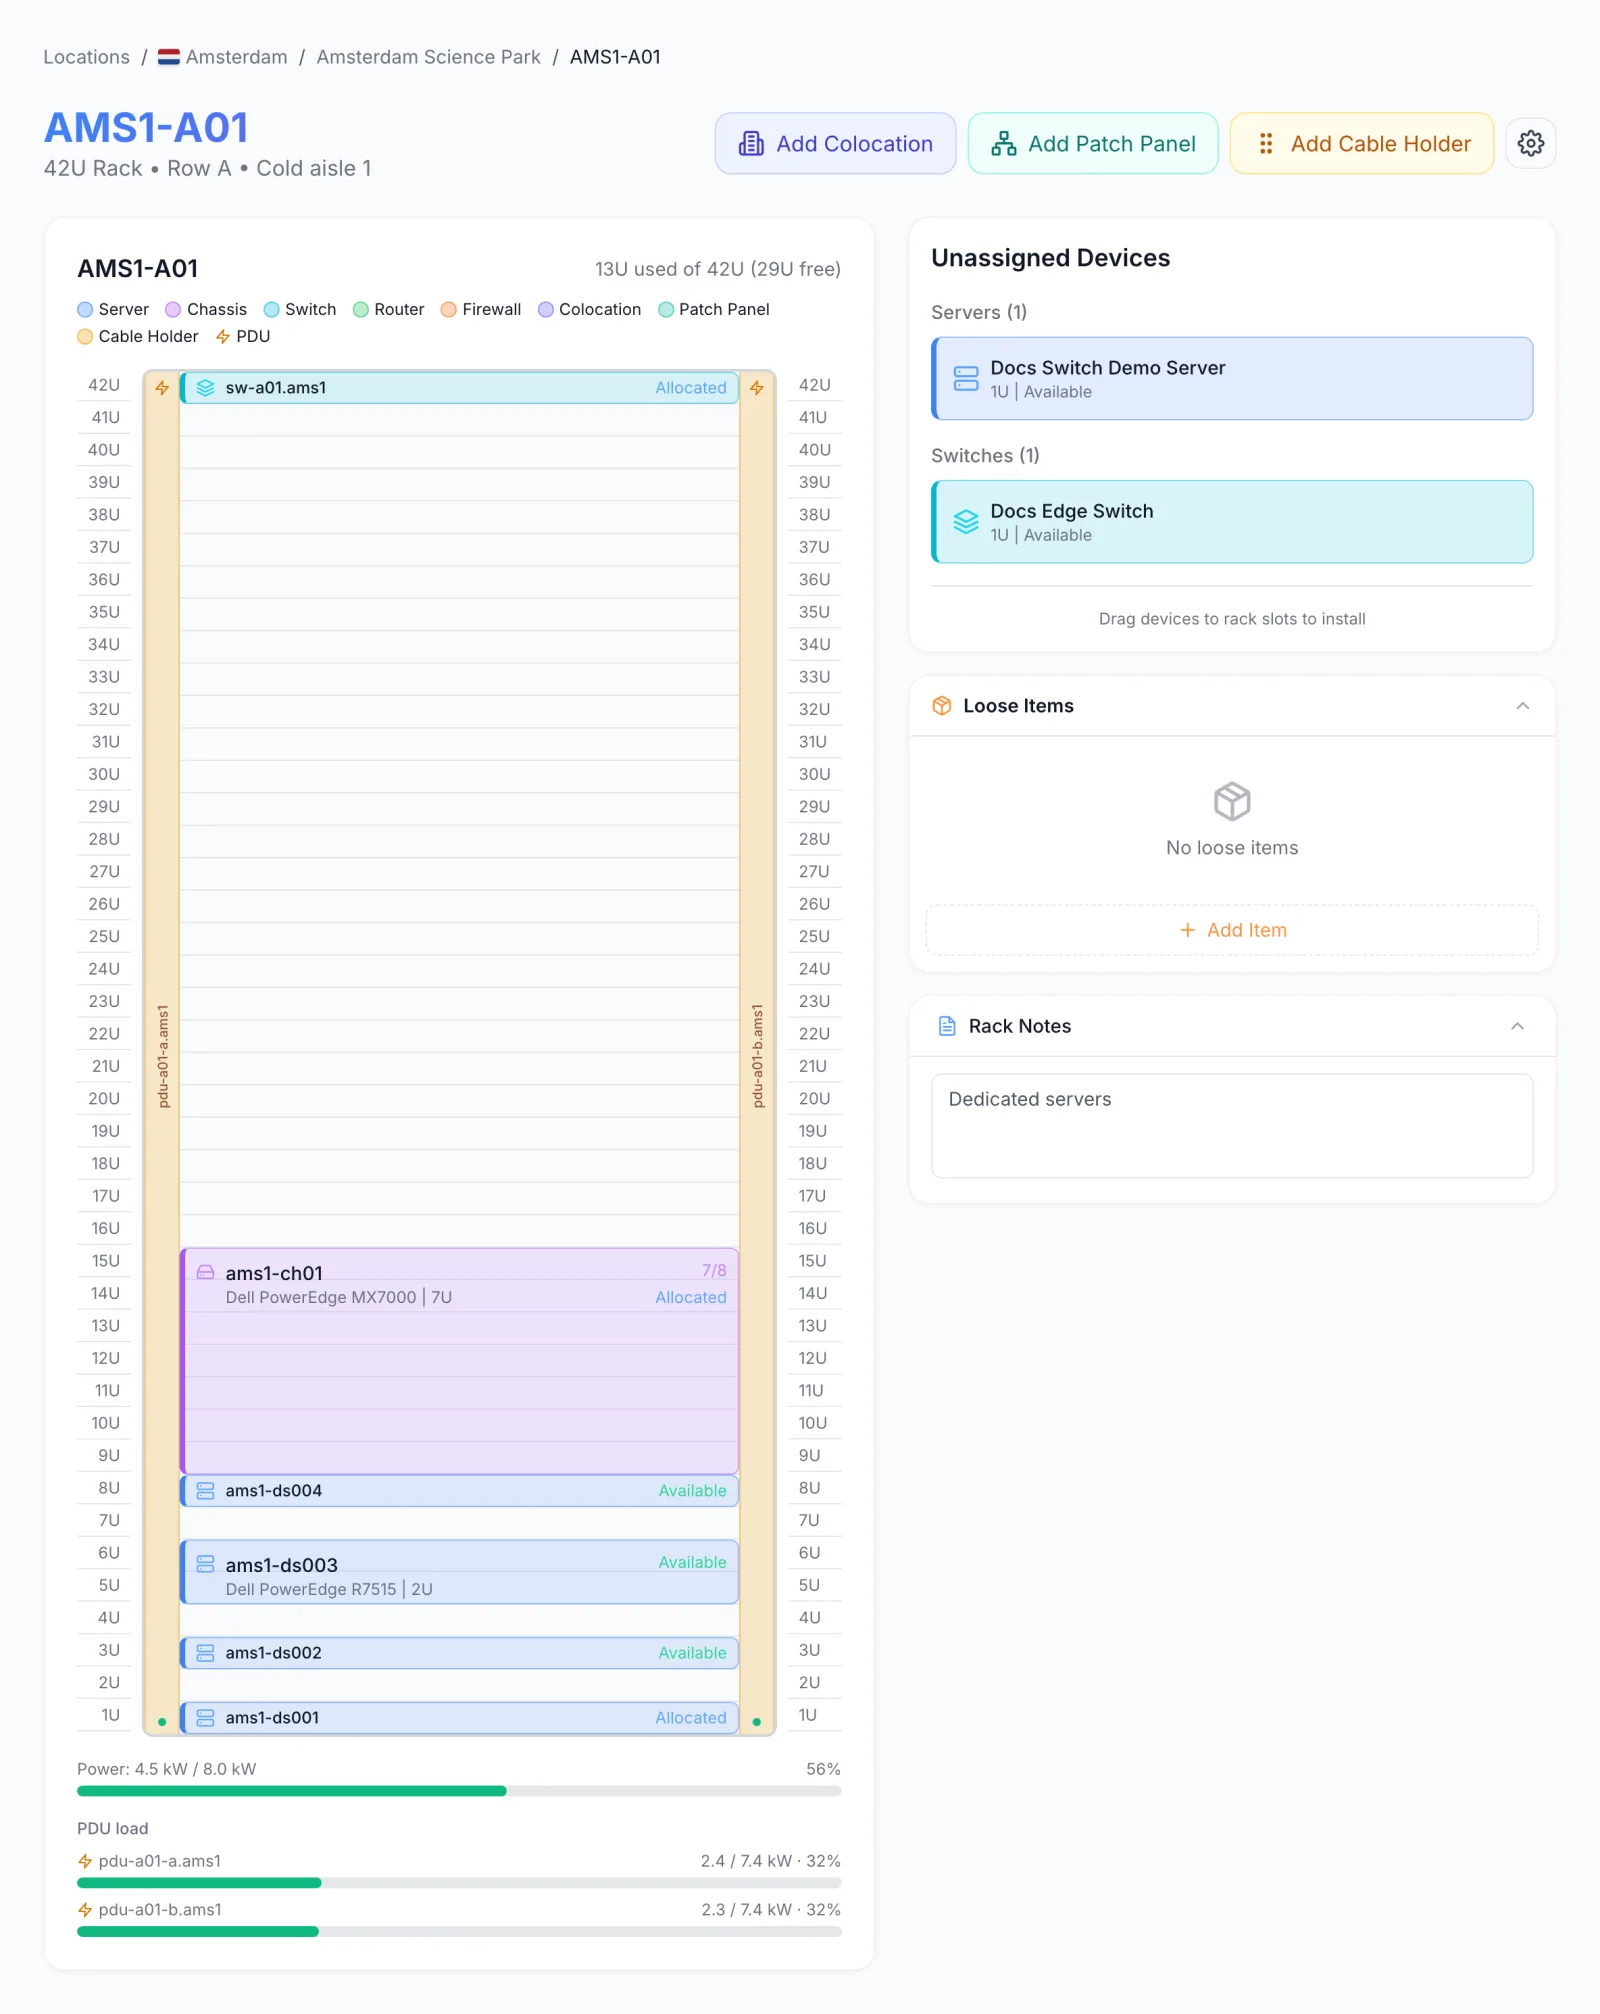
In Locations → location → datacenter → rack:
- Side rails. Each rail PDU is a narrow strip on the left or right rail, drawn over its U range, or over the full rail height when no position is set. Several PDUs on one rail sit side by side. The dot at the bottom of the strip shows the load colour (grey when there is no percentage). Hover over the strip to see its name, U range and rail.
- Horizontal PDUs appear as normal blocks in the rack units they occupy.
- PDU load. Under the rack, each PDU in the rack gets a line with its load, such as 2.4 / 7.4 kW · 32%, and a coloured bar. Without a rated capacity, only the watts or amps are shown. A PDU that has never been read shows No data.
- Drag to place. Drag a PDU onto the left or right rail to mount it there. It keeps its U range, which you can adjust on the Location tab. Drop it on a front U slot to mount it horizontally at that unit.
A PDU supplies power, so its own load is not counted against the rack's power budget. The budget bar counts only the power recorded on the devices and colocation spaces in the rack.
Read many PDUs at once
To refresh several PDUs at once, click Fetch Details in the Inventory header and tick PDUs (Fetch model, outlets & load via SNMP). PDUs without a management IP or SNMP credentials are skipped and counted in the dialog. For each PDU that answers, FluxBilling updates the model, serial number, SNMP vendor, firmware and outlet count it can read, and saves a fresh load reading. Progress shows in the Automations menu.
Which PDUs FluxBilling can read
FluxBilling recognises APC, Raritan, ServerTech (Sentry), Eaton, CyberPower, Geist, Vertiv and Tripp Lite from the system description the PDU reports over SNMP, and fills in SNMP vendor with that name. For some of these brands it also reads the brand's own load table, which gives per-phase current. For every other brand, and whenever that table returns nothing, it reads the standard SNMP sensor table (ENTITY-SENSOR-MIB), which most modern PDUs provide.
The details FluxBilling can fill in depend on the brand and firmware:
- APC PDUs report the model, firmware and outlet count.
- Raritan and ServerTech PDUs report the model.
- The serial number is read from the standard SNMP equipment table where the PDU provides it.
Anything the PDU does not report stays empty. Type it on the Overview tab.
FluxBilling reads the total load and, where reported, the load per phase. It does not show or switch individual outlets.
Troubleshooting
| Message | What it means and what to do |
|---|---|
| Set a management IP first | Test & fetch needs an address. Click Edit, pick or type the Management IP on the SNMP tab, then try again. |
| Enter the SNMP community first | The version is SNMPv2c and Test & fetch has no community string to use. Click Edit, type the community string on the SNMP tab and try again, or use Refresh on the Power tab, which reads the load with the saved credentials. |
| Enter the SNMP v3 username and auth password first | The version is SNMPv3 and the username or auth password is missing. Click Edit, type them on the SNMP tab and try again. |
| PDU has no management IP configured | Refresh uses the saved management IP and there is none. Set it, save, and refresh again. |
| No load data returned (SNMP unreachable or unsupported) | The PDU did not answer, or it answered without any current, power or voltage readings. Check that the IP is reachable on UDP 161 from FluxBilling or from the local agent for that location, that SNMP is on in the PDU, and that the community string or v3 user matches. If the PDU answers but reports no load, its firmware may not provide the sensor table. |
| SNMP test failed — check IP, credentials, and firewall | Test & fetch could not complete. Check the same points as above. |
| Failed to save PDU | The changes were not saved. A more specific reason is shown when one is available. |
The load percentage is missing. Enter Rated capacity (kW) or Rated current (A) on the Overview tab.
The load reading is old. Check Last polled on the Power tab and click Refresh, or use Fetch Details for many PDUs at once.
The PDU is on a private network. Install a local agent in that location. FluxBilling then sends SNMP requests to the PDU through the agent for the PDU's location.