
Proxmox VE: sell and automate KVM virtual machines
Set up the free Proxmox VE plugin: API token, cloud-init template, products, what customers see, the billing lifecycle and troubleshooting.
The Proxmox VE plugin connects FluxBilling to the API of your Proxmox VE server, so you can sell KVM virtual machines as FluxBilling products. FluxBilling takes the order, sends the invoice and collects the payment. When the invoice is paid, the plugin clones one of your cloud-init templates into a new virtual machine, sizes it to the product and starts it. The customer then manages the VM from the FluxBilling client area. The plugin is free and is listed in the plugin marketplace of every FluxBilling panel. Your Proxmox VE installation and subscription stay as they are.
This guide covers plugin version 1.6.0, built for Proxmox VE 7, 8 and 9. It walks through the setup in the order you do it, then explains what happens to a VM over its life and what to check when something does not work.
Who supports this integration. The plugin is built and maintained by FluxBilling. If something does not work, contact FluxBilling support at contact@fluxbilling.app or through fluxbilling.app/contact. Questions about Proxmox VE itself, its subscription or your nodes go to Proxmox.
What you need before you start
- FluxBilling 0.0.1572 or newer.
- A working Proxmox VE 7, 8 or 9 server (a single node or a cluster) with its web interface and API on port 8006, or the port you moved it to.
- At least one cloud-init template: a KVM virtual machine with a cloud-init drive, converted to a template. Each FluxBilling product clones one template. Proxmox describes how to build one in Cloud-Init Support.
- The QEMU guest agent inside the template, with the QEMU Guest Agent option switched on for the VM. The plugin reads the VM's IP address from the guest agent. See Qemu-guest-agent.
- A way for new VMs to get their address. The plugin passes the product's cloud-init IP configuration to the VM. The usual choice is
ip=dhcpwith a DHCP server on the bridge the VM is attached to. The plugin does not hand out addresses itself. - Network access from your FluxBilling panel to the Proxmox API on port 8006. A self-signed certificate on the Proxmox side is accepted. For the console, FluxBilling also connects straight to the node that runs the VM, on the VNC port Proxmox opens for that session (Proxmox uses TCP ports 5900 to 5999 for consoles), so allow those ports from FluxBilling to every node.
- A backup storage, only if you offer backups: a Proxmox storage with the content type VZDump backup file.
Step 1: Prepare a cloud-init template
Build the template in Proxmox the way Proxmox describes it: import a cloud image as the boot disk, add a cloud-init drive, set the boot order, install the QEMU guest agent and convert the VM with qm template. Note two things while you do it:
- The boot disk name, for example
scsi0orvirtio0. You enter it on the product, so the plugin grows the right disk. - The boot disk size. Proxmox disks can only grow, so the disk size you sell must be at least the template's disk size.
The plugin sets the VM's password through cloud-init for the product's cloud-init User (step 6), or for the image's default user when that field is empty. The welcome email and the customer's Access card name that field's user as the login, or root when it is empty. So enter the image's login user there, for example debian on Debian cloud images, unless it is root.
Step 2: Create an API token in Proxmox
The plugin signs every request with a Proxmox API token. We recommend a separate token for FluxBilling, so you can limit it and revoke it without touching anything else.
- In the Proxmox web interface, open Datacenter → Permissions → API Tokens and click Add.
- Choose the user that owns the token, for example
root@pam, and a Token ID, for examplefluxbilling. The full token ID is thenroot@pam!fluxbilling. - Leave Privilege Separation on to give the token only the permissions below, or switch it off to let the token act with all the permissions of its user.
- Click Add and copy the Secret. Proxmox shows it only once.
- With privilege separation on, open Datacenter → Permissions, choose Add → API Token Permission and add the roles in the table below, one row per path.
Proxmox explains tokens, privilege separation and the built-in roles in User Management, and the token header format in Proxmox VE API.
| Path | Role | Used for |
|---|---|---|
/vms | PVEVMAdmin | Cloning, configuring, starting, stopping, resizing and deleting VMs, snapshots, backups and restores, usage history |
/storage | PVEDatastoreUser | Placing the cloned disks, listing storages in the product editor, and writing, listing and deleting backups on the backup storage |
/ | PVEAuditor | Reading nodes, templates, bridges, the next free VM ID and each VM's task history |
/sdn/zones/localnetwork | PVESDNUser (Proxmox VE 8 and 9) | Attaching VMs to the node's bridges |
If you build a custom role instead, it needs VM.Config.Cloudinit to set the password and IP configuration (required on Proxmox VE 9.2), and VM.GuestAgent.Audit on Proxmox VE 9 (VM.Monitor on 7 and 8) to read the VM's address from the guest agent. For backups it also needs VM.Backup on /vms and Datastore.AllocateSpace on the backup storage.
Step 3: Install the plugin
- In the FluxBilling admin panel, open Settings (the gear icon in the top bar).
- Under Integrations, open Marketplace. Stay on the Browse tab.
- Open the Proxmox VE Provider card and click Get for Free.
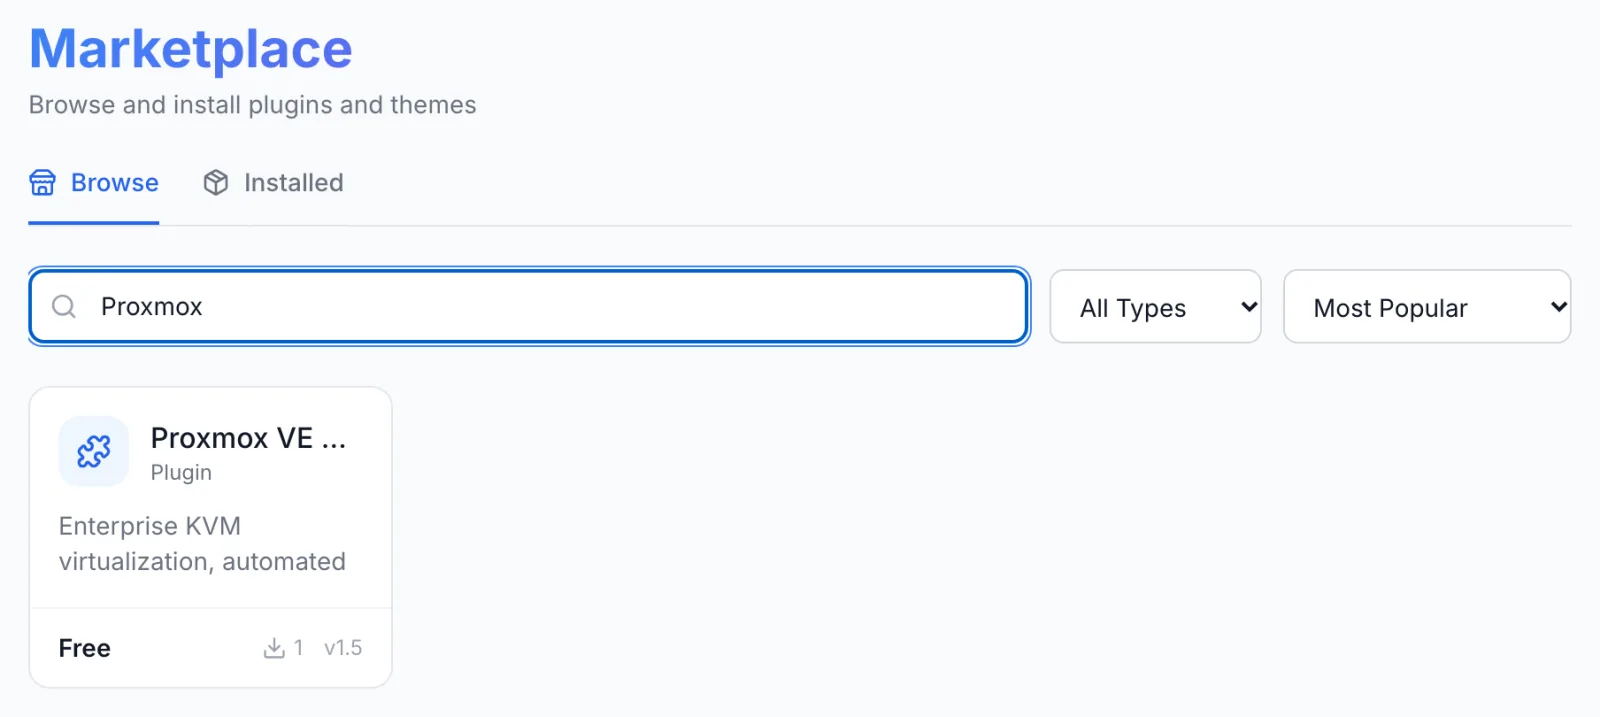
FluxBilling confirms with Plugin "Proxmox VE Provider" installed and ready to use. The plugin is switched on straight away and appears under Settings → Integrations → Plugins under the same name, marked Active.
Step 4: Connect it to Proxmox VE
- Open Settings → Integrations → Plugins.
- On the Proxmox VE Provider card, click Configure.
- Fill in the fields below and click Save Configuration.
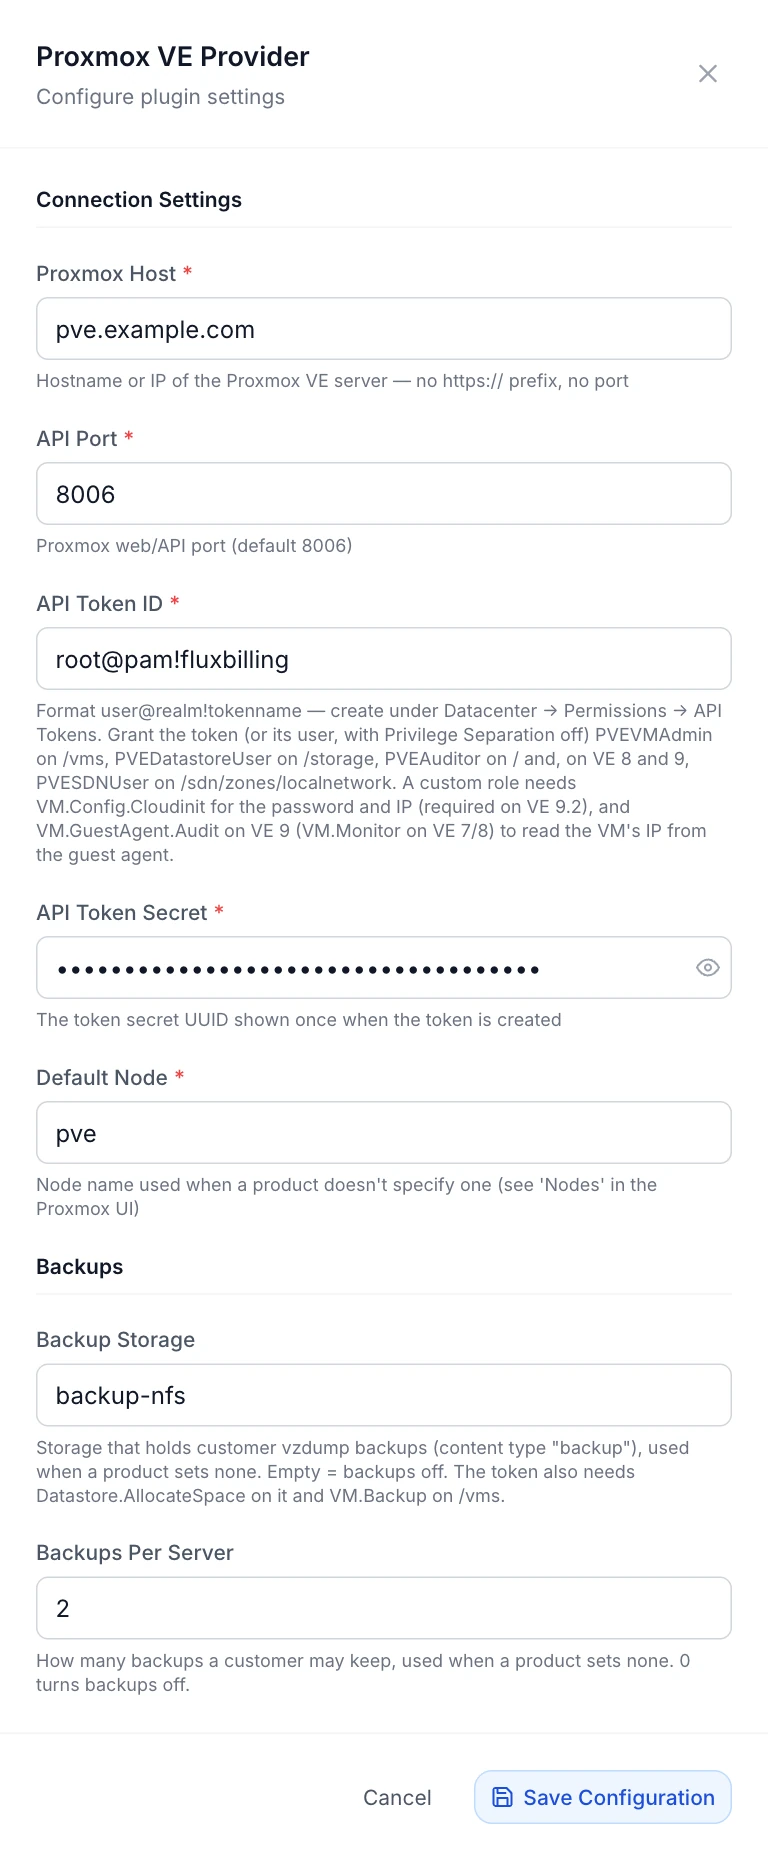
| Field | What to enter |
|---|---|
| Proxmox Host (required) | The hostname or IP address of your Proxmox VE server, without https:// and without a port. For example pve.example.com. In a cluster, enter one node that FluxBilling can reach; it serves the API for the whole cluster. |
| API Port (required) | The Proxmox web and API port. The field starts at 8006, the Proxmox standard. |
| API Token ID (required) | The full token ID from step 2 in the form user@realm!tokenname, for example root@pam!fluxbilling. |
| API Token Secret (required) | The secret Proxmox showed when you created the token. |
| Default Node (required) | The node name, as listed under Datacenter in Proxmox, used for products that do not name a node. For example pve. |
The Backups section below holds optional defaults; a product can set its own (step 6).
| Field | What to enter |
|---|---|
| Backup Storage | The ID of the Proxmox storage that holds customer backups, for example backup-nfs, used for products that do not name one. Leave it empty to offer backups only on products that set their own storage. |
| Backups Per Server | How many backups a customer may keep, used for products that do not set a number. 0 turns backups off. The field starts at 2. |
The token secret is stored encrypted. FluxBilling shows Configuration saved successfully when the settings are saved. If a required field is missing, it saves the form but tells you the plugin is not configured until you fix the field it names.
Test the connection
On Settings → Integrations → Plugins, click the Proxmox VE Provider card itself (not Configure), switch to the Connections tab and click Test connection on the Proxmox VE API row. The test signs in with the token and checks that it sees the Default Node online. It answers like Connected: Proxmox VE 9.0.3, default node pve online (2 nodes visible), or names the problem (see Troubleshooting).
Step 5: Create a category for your Proxmox products
In FluxBilling, the category decides how its products are delivered. Every product in the category is built by the plugin you choose here.
- Open Products, switch to the Categories tab and click Add Category.
- When FluxBilling asks What does this category sell?, choose Plugins. Do not choose VPS: that type is FluxBilling's own KVM module, not Proxmox.
- Enter a Name. The URL slug fills in by itself.
- Under How paid orders are fulfilled, click Proxmox VE Provider.
- Under Availability, choose Live to show the category on the order page, or Unlisted while you test.
- Click Create Category.
Step 6: Create a product for each VM size
Each product points at one template and carries its own size. Two products can clone the same template and differ only in cores, memory and disk.
- On the Products tab, click Add Product and choose the category from step 5.
- On General, enter the product name and description your customers will see.
- On Configuration, fill in the Proxmox fields described below.
- On Pricing, set the price. Prices, billing cycles, taxes and add-ons all live in FluxBilling.
- Click Create Product.
| Field | What it does |
|---|---|
| Node | The Proxmox node new VMs are created on, picked from the nodes Proxmox reports. Leave it empty to use the Default Node from the plugin settings. |
| Template VM (required) | The cloud-init template cloned for each order. The list shows the templates on the chosen node. |
| Reinstall Templates | The templates a customer may choose when they reinstall the VM. The Template VM is always allowed. Leave it empty to offer every template on the node. |
| CPU Cores (required) | The number of vCPU cores. |
| Memory (MB) (required) | RAM in megabytes, for example 2048 for 2 GB. |
| Disk (GB) (required) | The size the boot disk is grown to. It must be at least the template's disk size, because Proxmox disks cannot shrink. |
| Boot Disk Device | The template's boot disk, usually scsi0 or virtio0. This is the disk that gets grown. |
| Target Storage | The storage for the cloned disks. Only used with full clones. Empty keeps the template's storage. |
| Network Bridge | Replaces the template's network card with a VirtIO card on this bridge. Empty keeps the template's network as it is. |
| Full Clone | On: each VM gets an independent copy of the template's disks (recommended). Off: a linked clone, which is faster but needs the template on shared or snapshot-capable storage. |
| Start On Node Boot | Starts the VM automatically when the Proxmox node boots. |
| IP Configuration | The cloud-init network setting for the first network card, for example ip=dhcp, or a fixed address such as ip=192.0.2.10/24,gw=192.0.2.1. A fixed address here is the same for every VM of the product, so it only suits a product you sell once. |
| DNS Servers | Optional name servers for cloud-init, separated by spaces. Empty uses the Proxmox defaults. |
| cloud-init User | The login user cloud-init sets up and gives the root password to. Empty keeps the image default. See step 1. |
| VM Name Prefix | Optional text put in front of the VM name in Proxmox, for example fb-. |
| Backup Storage | Where the customer backups of this product go, picked from the node's storages that accept backups. Empty uses the Backup Storage from the plugin settings; with neither set, the product has no backups. |
| Backups Per Server | How many backups a customer may keep on this product. Empty uses the plugin setting; 0 turns backups off for the product. |
The plugin adds no product options of its own: the size of the VM comes from these fields, and upgrades move the customer to another product (see Plan changes).
Step 7: Place a test order
Place an order for each product before you sell it, for example from a test client account. The order form asks for one thing besides the billing cycle.
Hostname is required. It may contain letters, numbers, hyphens and dots, up to 253 characters, and each part between the dots must start and end with a letter or number. Otherwise the customer sees Hostname must be a valid hostname (e.g. my-server) — no spaces or special characters. The order form does not ask for a password: FluxBilling generates a 16-character root password for each VM.
What happens when the invoice is paid
With Auto Provisioning switched on (see Billing lifecycle), FluxBilling starts the build as soon as the invoice is paid:
- The VM ID. The plugin asks Proxmox for the next free VM ID, and uses the product's node or the default node.
- The clone. It clones the product's template under that ID. The VM is named after the hostname, with the name prefix in front, dots and spaces turned into hyphens, in lower case. Proxmox runs the clone as a task; the plugin checks it every 4 seconds, for up to 20 checks, and carries on when the task reports OK (warnings are accepted).
- The configuration. It sets the cores, memory, Start On Node Boot, the network bridge if you chose one, and the cloud-init user, password, IP configuration and DNS servers. The VM description in Proxmox reads Managed by FluxBilling (service …).
- The disk. It grows the boot disk to the product's disk size and waits for Proxmox to finish.
- Start. It starts the VM and reads its state.
- Hand-over. FluxBilling saves the VM ID and node on the service, stores the login (the product's cloud-init User, or
root) and the password, and marks the service Active. With the default email templates, the customer gets an email that the server is ready, with the hostname, the login user and the password.
The VM's IP address is assigned inside the VM by cloud-init, so it is not known when the build finishes. It appears on the service page as soon as the QEMU guest agent in the VM reports it.
What your customers can do
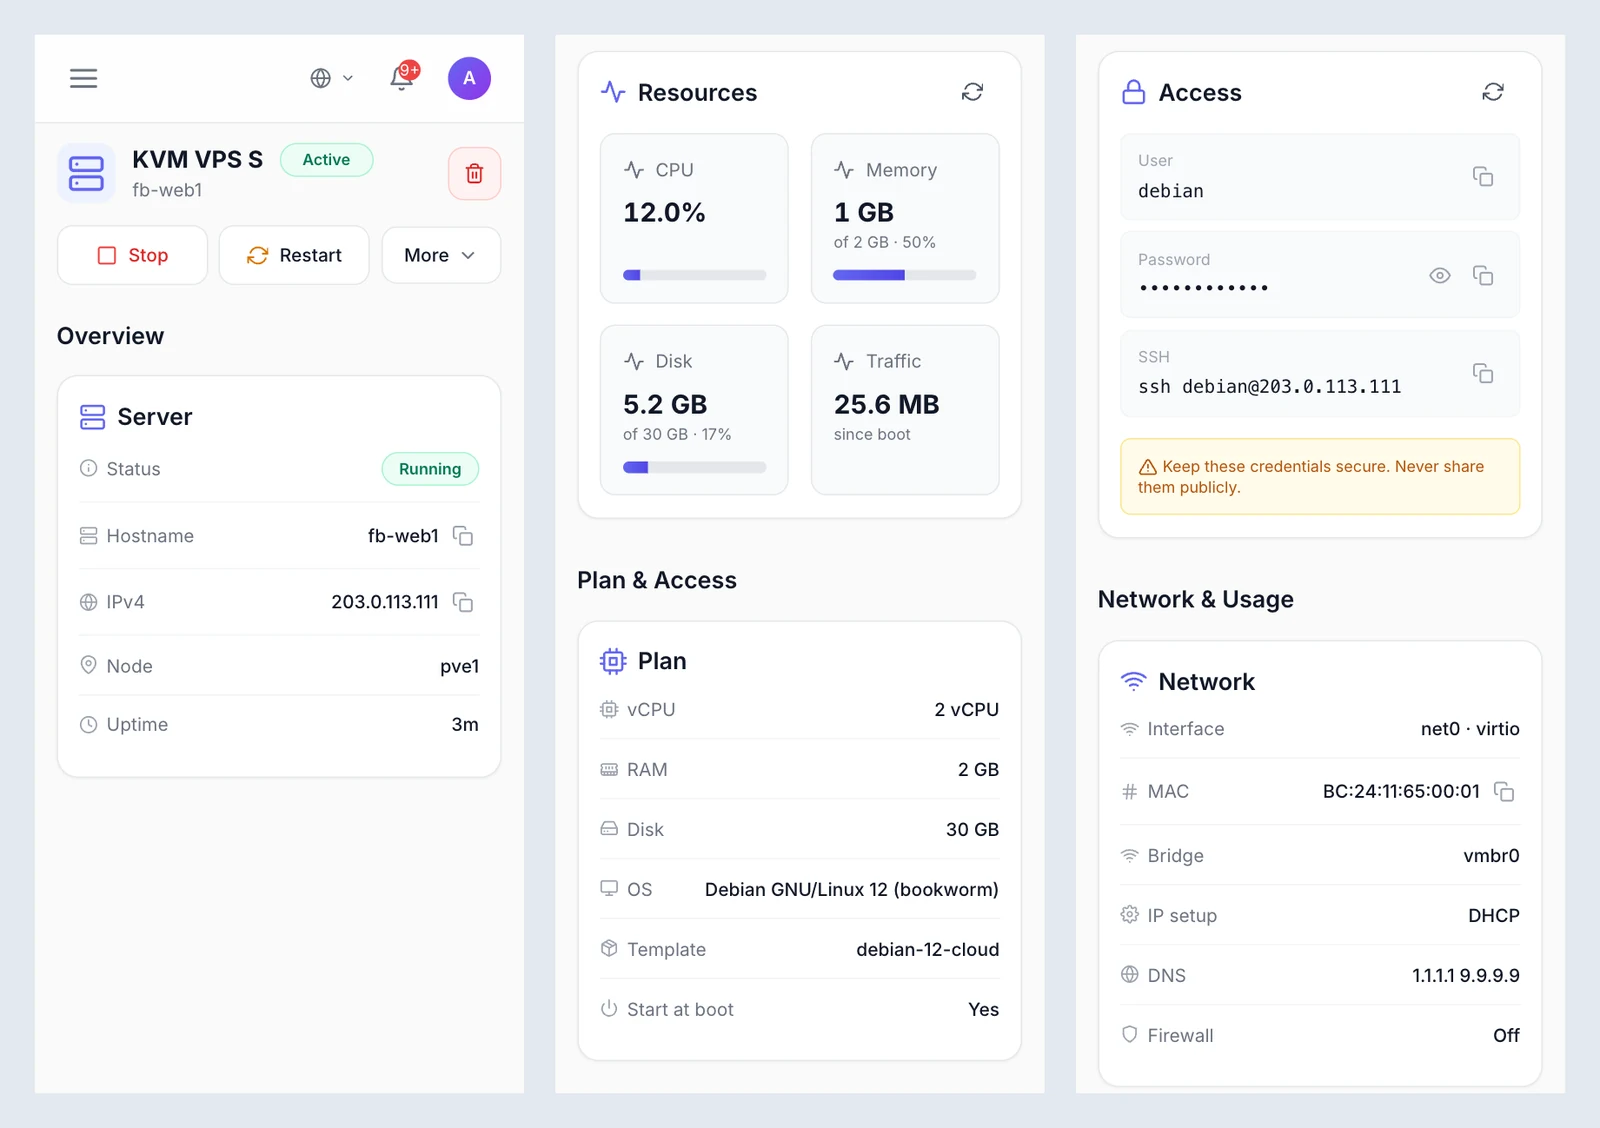
In the client area, the customer opens the service. The power buttons sit at the top of the page; the plugin's cards follow below:
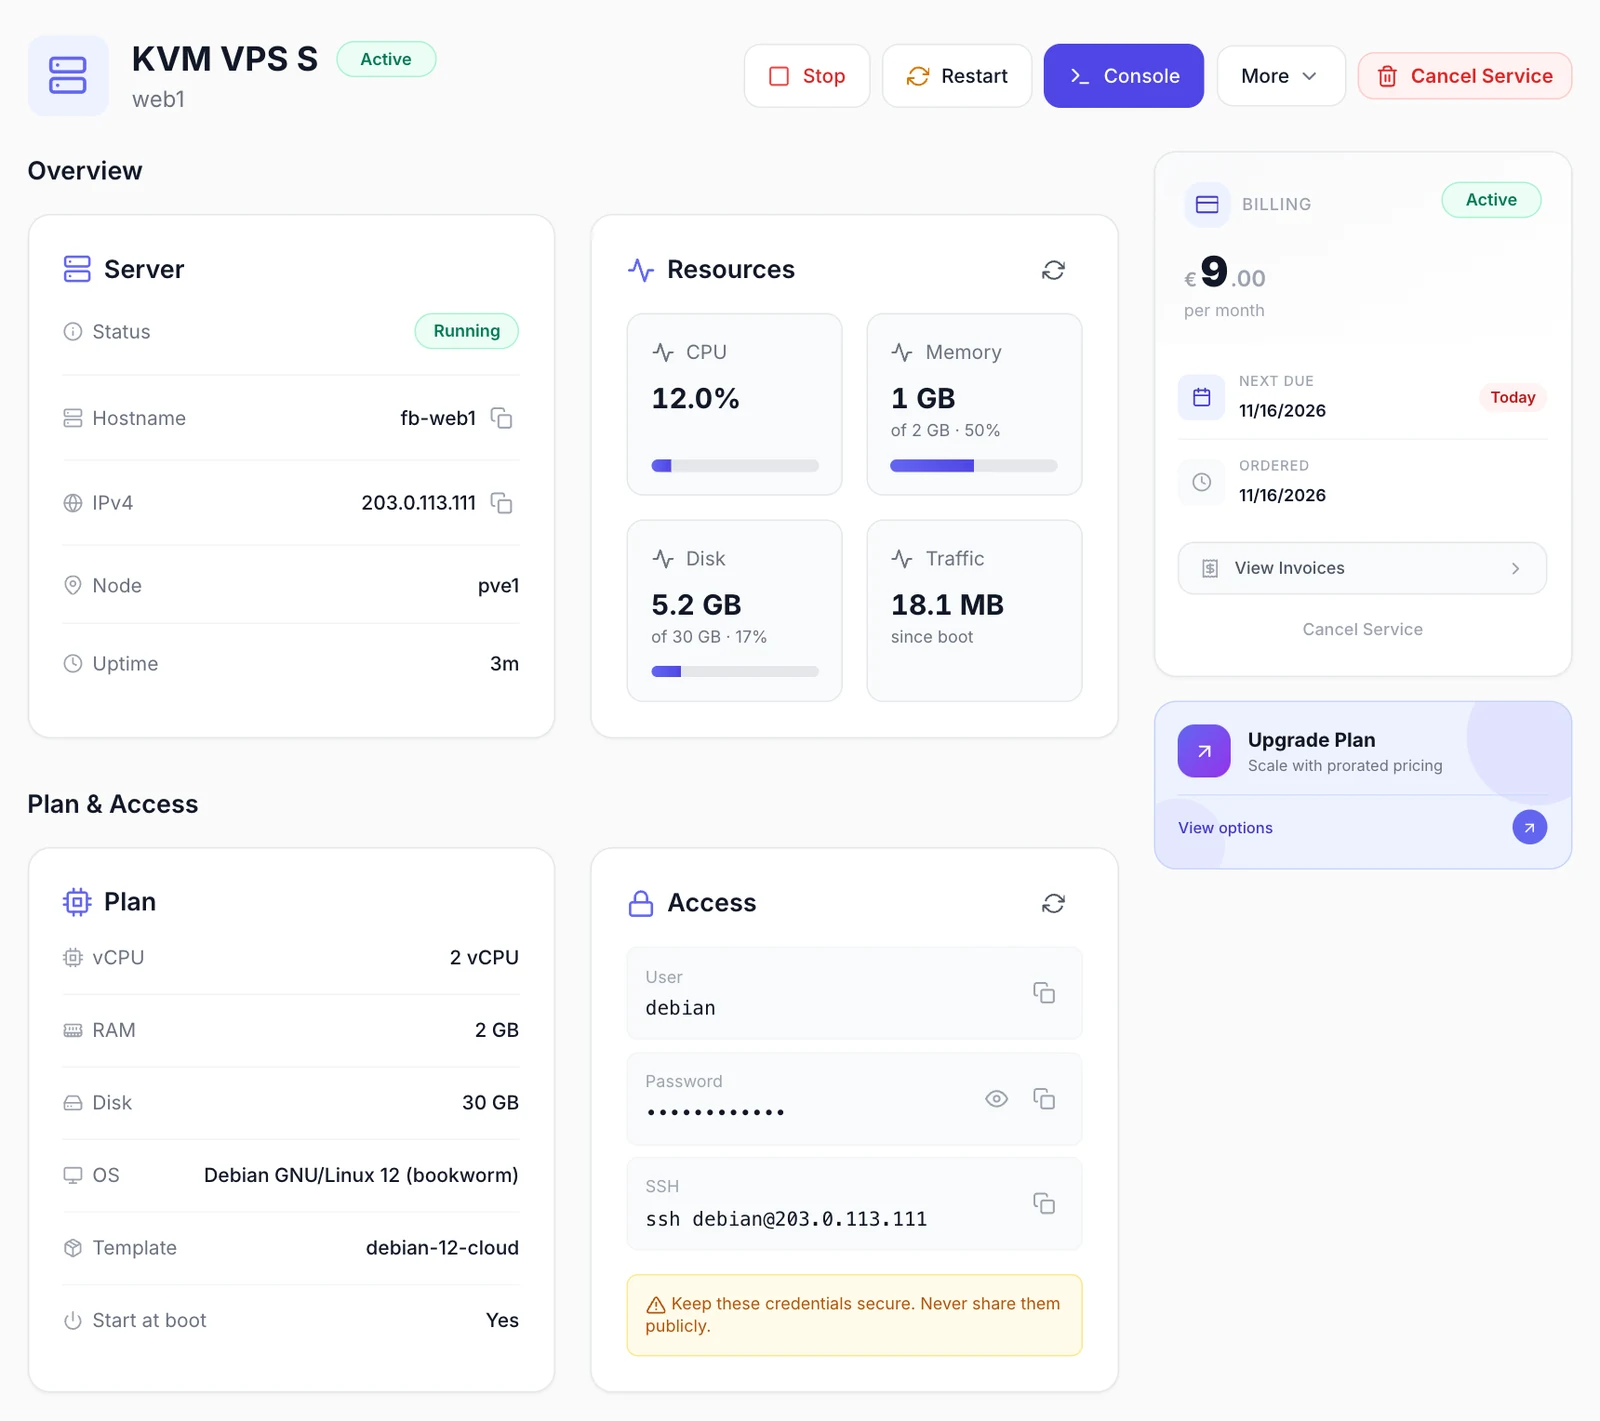
| Where | What the customer sees and can do |
|---|---|
| Top of the page | Start while the VM is stopped or paused. Stop, Restart and Console while it runs: Stop asks for confirmation and forces the VM off if it has not shut down after 60 seconds; Console opens the VM's screen in a window on the page. More holds Force Stop (off at once, like pulling the plug, after a confirmation), Reinstall and Reset Password. |
| Server | Status, Hostname, IPv4, IPv6 when the VM reports one, Node and Uptime. |
| Resources | CPU in percent, Memory and Disk used out of the total, and Traffic since the VM last started. Refreshed every 15 seconds. |
| Plan | vCPU, RAM, Disk, OS (as the guest agent reports it), Template and Start at boot. |
| Access | User, Password (masked until the customer clicks Show, hidden again after one minute) and SSH, the command to connect with. See Access and password. |
| Network | The first network card: Interface, MAC, Bridge (with its VLAN tag), IP setup (DHCP or the static address), DNS and Firewall (the Proxmox firewall on or off). |
| This Month | Traffic in, Traffic out, Disk read and Disk write since the 1st of the month (UTC). |
| Snapshots, Backups | See Snapshots and Backups. |
| Recent Activity | The last 10 Proxmox tasks of this VM, such as Start or Backup, with When, Took and Result. |
While a service is suspended, the plugin's cards and buttons are hidden and the customer sees a Service Suspended notice.
Access and password
- Show reveals the stored password, only while the service is active and the customer's account is not suspended. Team members also need the Manage Services permission. Every reveal is recorded in the activity log.
- Reset Password writes a new password of at least 8 characters to the VM's cloud-init settings. Proxmox applies it at the next start: Root password updated in cloud-init. It is applied on the next VM reboot — restart the server to activate it.
- Reinstall asks for an Operating System, from the templates the product allows, and a New Root Password of at least 8 characters. It deletes the VM with its disks and snapshots, clones the template under the same VM ID with the previous cores, memory, disk size and cloud-init settings, and starts it. Backups are kept.
- After a reset or reinstall, Show reveals the new password.
Snapshots
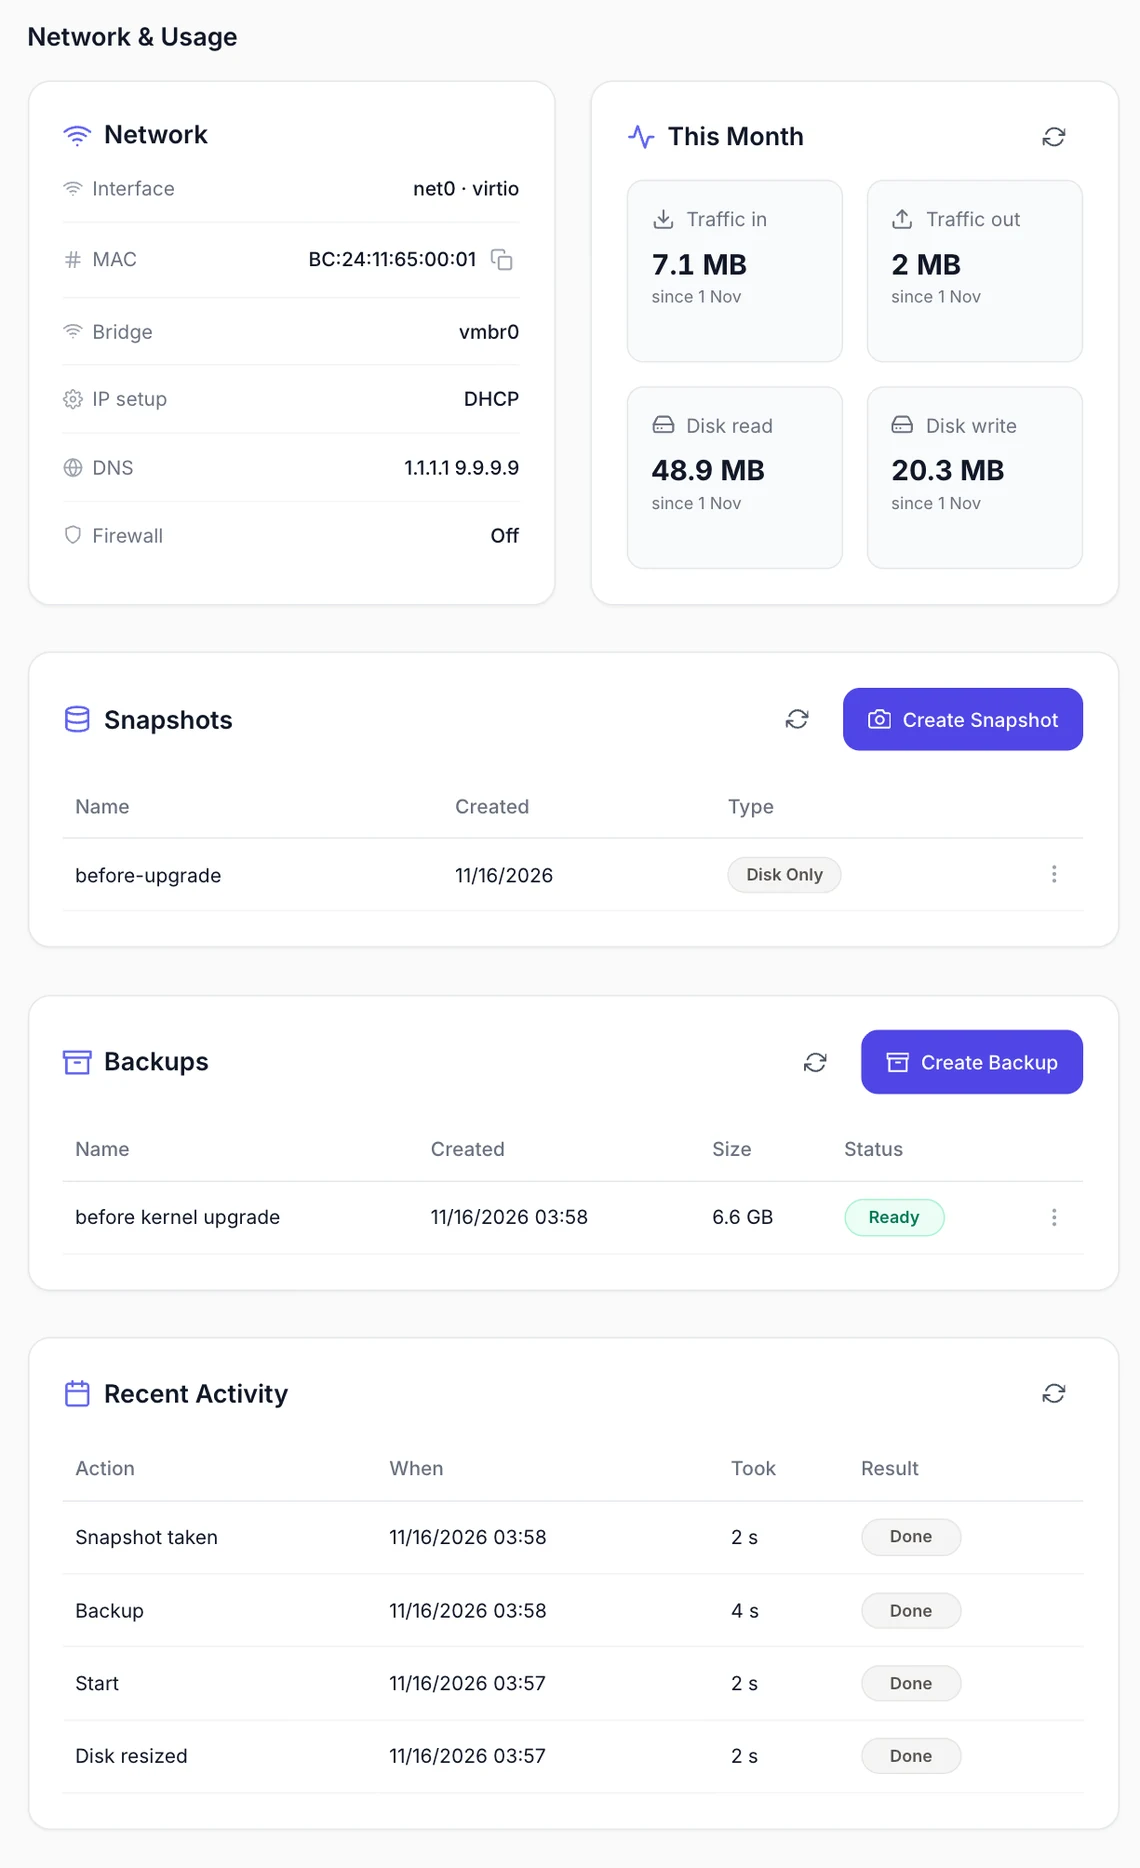
- The Snapshots card lists Name, Created and Type. Create Snapshot asks for an optional Description, which the list shows as the name.
- A snapshot is a point-in-time copy of the VM's disks, without the RAM state. FluxBilling names it
fbfollowed by a number in Proxmox. It appears in the list once Proxmox has finished it. - Restore rolls the VM back to the snapshot and starts it again; everything written after it is lost. Delete removes the snapshot. Both ask for confirmation.
- Snapshots need storage that supports them, such as LVM-thin, ZFS, Ceph or qcow2 files. On other storage, Proxmox refuses the snapshot and the customer sees its message.
- The plugin does not limit how many snapshots a customer keeps. Snapshots use space on your storage until they are deleted, and are deleted with the VM, also when the VM is reinstalled.
Backups
A backup is a full copy of the VM in a Proxmox backup file on the backup storage. Backups are on for a VM when it has a Backup Storage (from its product or the plugin settings) and Backups Per Server is above 0; only then does Create Backup show.
- The Backups card lists Name, Created, Size and Status. Create Backup asks for an optional Label, saved as the backup's note in Proxmox and shown as its name. The VM keeps running during the backup (snapshot mode, zstd compression), which appears in the list after a few minutes.
- At the limit the customer sees This server already has 2 backups, the most allowed — delete one first.
- Restore stops the VM, writes the backup over it and starts it again; everything written after the backup is lost. Delete removes the backup file. Both ask for confirmation and work only on the VM's own backups.
- The list shows every backup of the VM's ID on that storage, including those of your own Proxmox backup jobs, and they count toward the limit. Use a storage your own backup jobs do not write to.
What your staff see
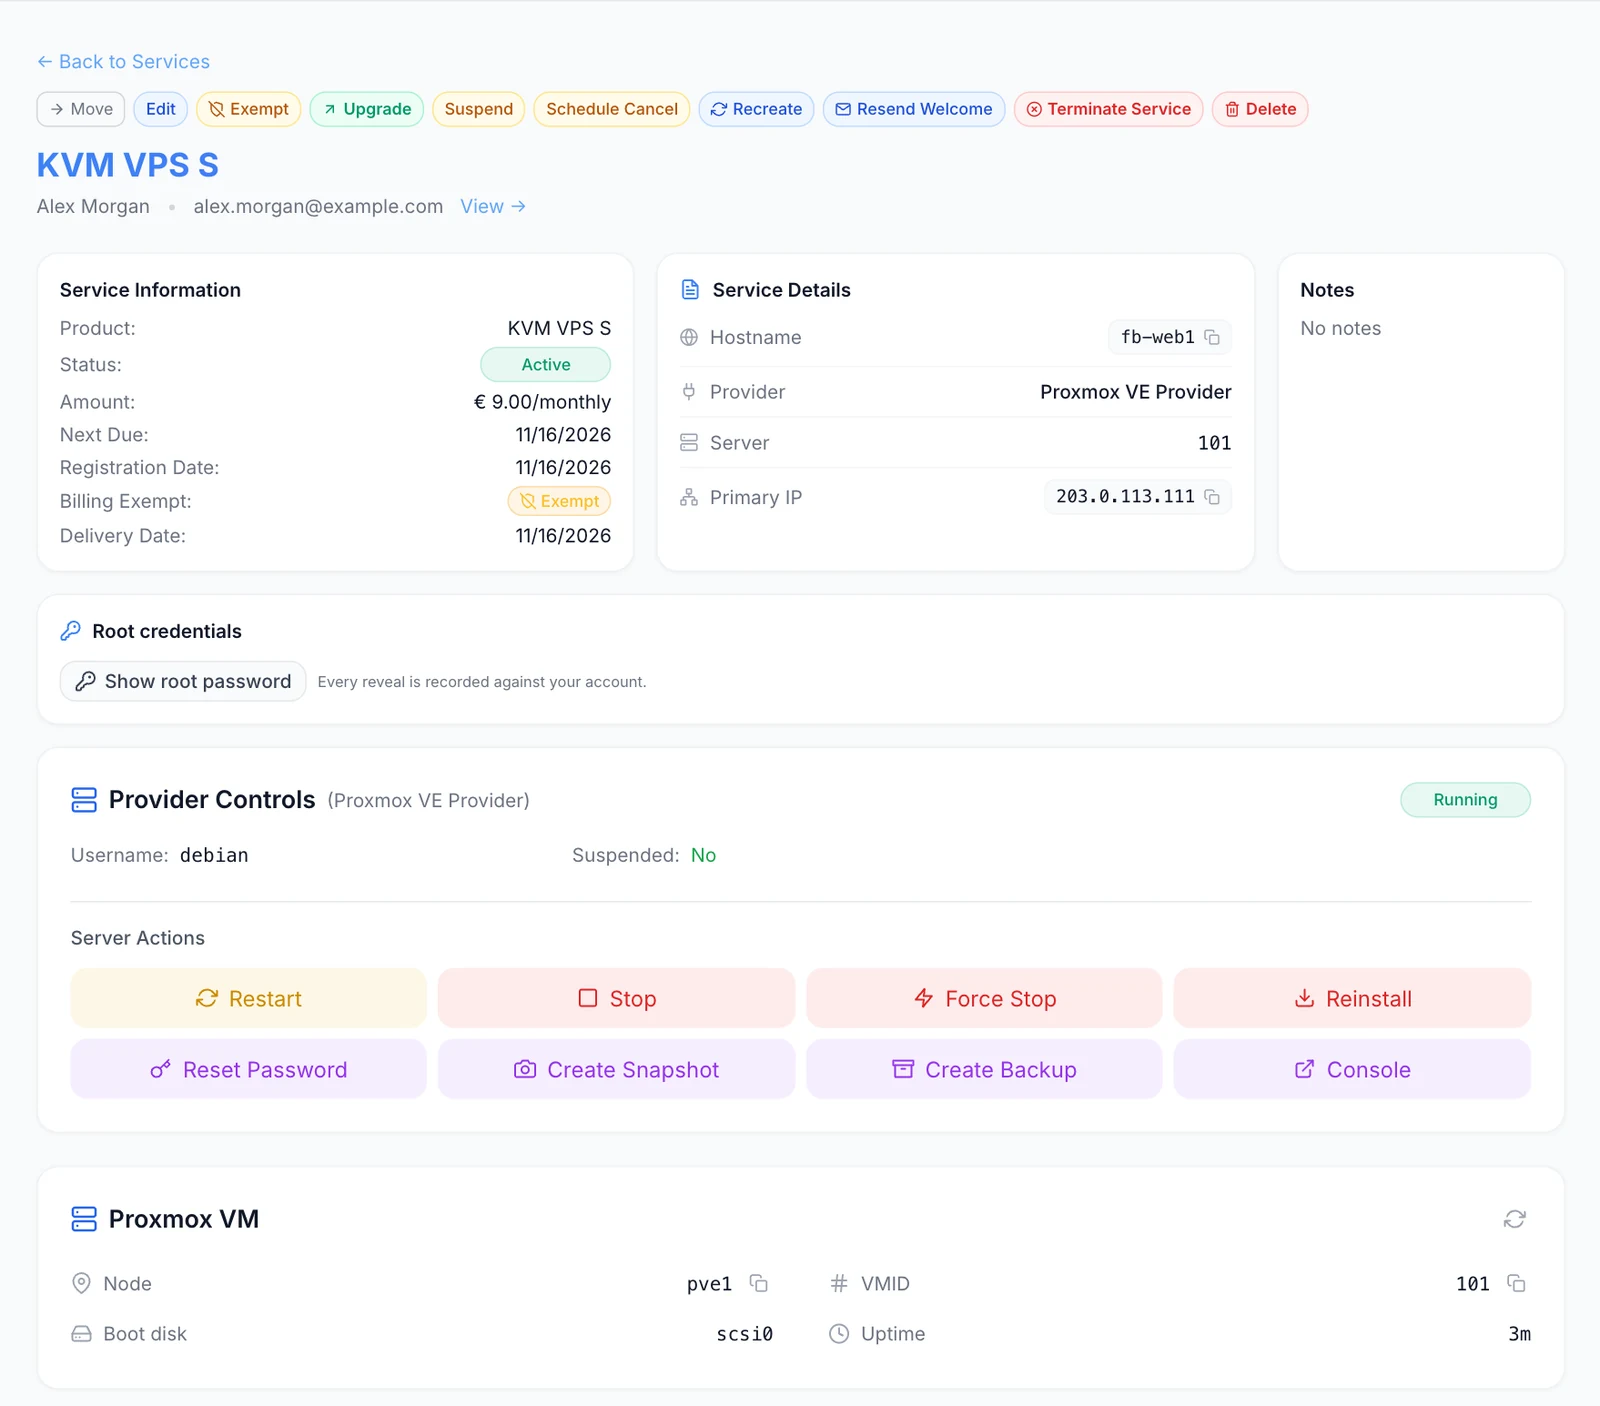
In the admin panel, the Service Details card shows the Proxmox VM ID as Server. Below it come these cards:
- Root credentials: Show root password shows the stored user and the masked password with a copy button, and hides itself after a minute. Every reveal is recorded against your account.
- Provider Controls: the VM's state, Username, Suspended, and the Server Actions Start, Restart, Stop, Force Stop, Reinstall, Reset Password, Create Snapshot, Create Backup (when backups are on) and Console, which opens the console in a window inside the admin panel.
- Proxmox VM: Node, VMID, Boot disk, IPv6 and Uptime.
- The customer's Resources, Plan, Network, This Month, Snapshots, Backups and Recent Activity cards, where staff can restore or delete snapshots and backups for the customer.
Reset Password asks for a New Root Password of at least 8 characters and Confirm Password, and works like the customer's reset, so restart the VM afterwards. Reinstall asks for an operating system and a new root password, and rebuilds the VM like the customer's reinstall.
Billing lifecycle
The invoice drives the VM. The rules are set under Settings → Billing → Automation:
- Auto Provisioning: builds the VM when the first invoice is paid. When it is off, the paid service waits as Pending until staff provision it.
- Auto Suspension with Suspension Grace: an invoice still unpaid that many days after its due date suspends the service. The plugin powers the VM off; its disks and configuration stay as they are.
- Paying the overdue invoice unsuspends the service automatically, once no earlier renewal invoice for that service is still unpaid. The plugin starts the VM again. A suspension for abuse is not lifted by a payment.
- Auto Termination with Termination Grace: a service still suspended for non-payment that many days later is terminated.
Terminating a service deletes the VM in Proxmox, with its disks and snapshots. The plugin powers the VM off, deletes it and waits for Proxmox to confirm. This happens when auto termination runs, when a customer's cancellation takes effect, or when staff terminate the service. It cannot be undone. Check the Termination Grace before you go live.
Backups stay on the backup storage. Termination does not delete the VM's backups. Delete them in Proxmox; their file names carry the VM ID.
Suspension does not change Start On Node Boot. If a Proxmox node restarts while a suspended VM on it has that option on, Proxmox starts the VM again. Check suspended VMs after node maintenance.
Plan changes
Customers can only move between products you link on the product's Upgrade Paths tab. When an upgrade or downgrade between two Proxmox products is paid, the plugin:
- sets the new product's CPU cores and memory on the VM. They take effect when the VM is restarted;
- grows the boot disk when the new product's disk is larger, and waits for Proxmox to finish. The VM keeps running, but the partition and file system have to be grown inside the VM, for example by the customer;
- leaves the disk as it is when the new product's disk is the same size or smaller;
- switches the VM to the new product's Backup Storage and Backups Per Server, or to the plugin settings where the new product sets none.
The node and template of an existing VM do not change with a plan change. If Proxmox refuses the change, the upgrade is marked as failed and the service keeps its current product. Try an upgrade on a test VM before you offer upgrades to customers.
Updating the plugin
Open Settings → Integrations → Marketplace, switch to Installed and click Check for Updates. When a new version is available, click Update to v…. Your connection settings and products are kept.
VMs built before version 1.6.0 get the new service page straight away. They take their backup settings from the plugin settings, not from their product, until their next plan change.
Troubleshooting
When a build fails, the service stays Pending. The error appears in the Automations menu in the top bar of the admin panel, as a Provision entry for the Proxmox plugin with the reason in red and a retry button. FluxBilling tries a failed build again by itself, up to two more times over the next minutes. After that, fix the cause, then open the service and click Retry Provisioning. A build started this way does not email the customer, so use Resend Welcome on the service page once it has worked.
Clean up before you retry. When a build stops after the clone, the half-built VM stays in Proxmox. Each automatic attempt clones a new VM with a new VM ID and does not remove the earlier one, so by the time you look there can be up to three. The error names only the latest VM ID. In Proxmox, find every VM named after the service's hostname, or with the note Managed by FluxBilling (service …), and delete them all before you click Retry Provisioning.
| Message or symptom | What to check |
|---|---|
| The Node or Template VM list in the product editor stays empty | FluxBilling cannot read from Proxmox, or the token may not list them. Check the host and port, the token ID and secret, the token's permissions (PVEAuditor on /), and any firewall between FluxBilling and Proxmox. If only the template list is empty, the chosen node has no VM converted to a template. |
| Proxmox VE at … rejected the API token (…) (connection test) | Proxmox answered but refused the token. Check the API Token ID (the full user@realm!tokenname) and the API Token Secret, and that the token has not expired or been removed. |
| No Proxmox VE API answered at … (…) (connection test) | FluxBilling got no answer from the Proxmox API. Check the Proxmox Host, the API Port and any firewall between FluxBilling and Proxmox. |
| Logged in to Proxmox VE …, but node "…" is not visible to this token (visible: …) or … but the node list failed (…) (connection test) | The token works but cannot list the node. Check the Default Node against the names in the message, and give the token PVEAuditor on /. If the message instead says the node is offline, the token works but Proxmox reports the node as down. |
| Cannot reach Proxmox API for VMID allocation: … | The first call of the build failed. The text after the colon is Proxmox's answer or the connection error. Check the same points as above. |
| Product is missing a valid 'Template VMID' — set it in the product's Proxmox configuration (module settings). | The product has no Template VM. Choose one on the product's Configuration tab. |
| Failed to clone template … to VMID …: … | Proxmox refused the clone, for example because the template is on another node, the target storage does not exist on that node, or the token lacks permission on /vms or /storage. Linked clones (Full Clone off) also fail when the template's storage cannot hold linked clones. |
| Clone task did not complete (status: …, exit: …). VMID … may need manual cleanup on node …. | The clone task failed or was still running after the checks ran out, for example on slow storage. Look at the task in the Proxmox task log, delete the VM it names, then retry. |
| VM … was cloned but applying config failed: … — delete VMID … on node … before retrying. | Proxmox refused the cores, memory, bridge or cloud-init settings. Check the IP Configuration and Network Bridge on the product, and that the token has VM.Config.Cloudinit and PVESDNUser where needed. Delete the VM it names, then retry. |
| VM … was created but failed to start: … — delete VMID … on node … before retrying, or start it manually. | Proxmox could not start the VM, for example because the node is short of memory. Start it in Proxmox, or delete it and retry. |
| The IP address stays empty on the service page | The QEMU guest agent is not running in the VM, the QEMU Guest Agent option is off for the template, the VM got no address, or the token lacks VM.GuestAgent.Audit (VE 9) or VM.Monitor (VE 7 and 8). |
| Failed to stop vm (suspension): … or Failed to start vm (unsuspension): … | Proxmox refused the power action. The service status in FluxBilling may then not match the VM. Check the VM in Proxmox. |
| Cannot read VM status: … | Suspend or unsuspend could not read the VM, for example because it was deleted or moved to another node in Proxmox. |
| Failed to delete VM …: … or Delete task did not complete (status: …, exit: …) | Termination did not finish. Check the VM in Proxmox, for example a lock or protection flag on it, and delete it there if needed. |
| Failed to create snapshot: … | Usually storage that does not support snapshots. See Snapshots. |
| Failed to set password: … | Proxmox refused the cloud-init change. Check VM.Config.Cloudinit on the token. |
| Template … is not offered for this server, so nothing was changed. Pick one of the offered templates. | A reinstall asked for a template the product does not allow. Add it to the product's Reinstall Templates, or pick an offered one. |
| Backups are not enabled for this server. | The VM has no backup storage, or its backup limit is 0. Set Backup Storage and Backups Per Server on the product or in the plugin settings. |
| Could not start the backup: … | Proxmox refused the backup, for example because the storage does not accept backups, is full, or the token lacks VM.Backup or Datastore.AllocateSpace. |
| The restore did not finish (exit: …) — check the server before using it | The restore task failed or was still running when FluxBilling stopped waiting, for example with a large backup on slow storage. Look at the task in the Proxmox task log, then start the VM once the restore is done, or restore again. |
Limits
- KVM virtual machines only. LXC containers are not provisioned by this plugin.
- Each product builds on one node: the product's node or the default node. The plugin does not spread VMs across the nodes of a cluster by itself; use one product per node, or change the node on the product, to place VMs on other nodes.
- IP addresses come from the product's cloud-init setting, usually DHCP. FluxBilling's own IP address management is not involved, and the plugin does not assign IPv6 addresses; an IPv6 address the guest agent reports is shown.
- Disks only grow. Moving to a product with a smaller disk changes cores and memory only.
- This Month figures are estimates from Proxmox's 12-hour averages, not exact meter readings.
- Backups go to one backup storage per VM, from its product or the plugin settings. The plugin does not schedule backups; the customer or your staff start each one.
- Each FluxBilling panel connects to one Proxmox VE server or cluster.
- FluxBilling does not rely on callbacks from Proxmox: each action is judged on Proxmox's direct answer and its task status. You do not need to set up anything for callbacks.
Moving away from the plugin later
If you later decide to run your hypervisors with FluxBilling's own VPS module, VPS Panel Migration can take over Proxmox VE nodes with the VMs already on them. It is a separate product from this free plugin.
Proxmox is a registered trademark of Proxmox Server Solutions GmbH. FluxBilling is not affiliated with Proxmox Server Solutions GmbH.