
Node Storage and Disk Redundancy
Check whether a VPS node's ZFS pools survive a dead disk, build new pools, add a mirror partner, and handle pools that fill up.
The Storage tab of a VPS node shows how the node's ZFS pools are built, whether they would survive a dead disk, and what state every disk is in. You can also use it to build a new pool on free disks and to add a mirror partner to a disk that has none. Two VPS Settings control what happens as a pool fills up: one stops new sales, the other moves VPS to other nodes automatically.
This page is for the staff who run your hypervisor nodes. Customers never see the Storage tab. They notice storage only when it goes wrong: a node whose pool is completely full pauses every guest on it.
Why the tab exists. A pool striped across six disks and a healthy RAID10 pool both report ONLINE, with the same health and a similar size. Every other screen in the panel shows only those figures. The Storage tab is the one place that says whether losing one disk would lose every VM on the node.
What you need
- The VPS Clusters feature toggle switched on in Settings → General → Feature Toggles. It needs Locations on too.
- View VPS Clusters to open the tab and preview a pool layout. Edit VPS Clusters to read the node, create a pool or run a disk action.
- A node with its agent connected. Every reading and every change is carried out by the agent on the node. Registering a node is covered in VPS nodes.
- ZFS on the node. The tab draws ZFS pools in full. Linux software RAID (mdraid) and LVM volume groups are listed under Other arrays on this node, but you cannot change them here.
Opening the Storage tab
- In the admin sidebar open VPS, then the Clusters tab.
- Open the node.
- Choose the Storage tab, next to Health.
A cluster that another panel shares with you has no Storage tab. Its disks belong to the panel that owns the hardware. The rest of a cluster's page is described in VPS clusters.
Reading the node
The tab opens straight away with the last reading the node sent. The line above the pools says when that was (Read from the node followed by a date and time), or This node has never been read.
Click Read the node to get a fresh reading. The node reports each pool's layout and state, every physical disk, and a SMART health check of each disk. Reading changes nothing on the node. A node with sleeping hard drives can take several seconds to answer. When the reading arrives you see Storage read from the node. If the node takes longer than about 45 seconds, the tab keeps showing the previous reading, and the new one appears the next time you open or refresh the tab.
A node that has never been read shows No storage picture yet. Click Read the node to fill the tab.
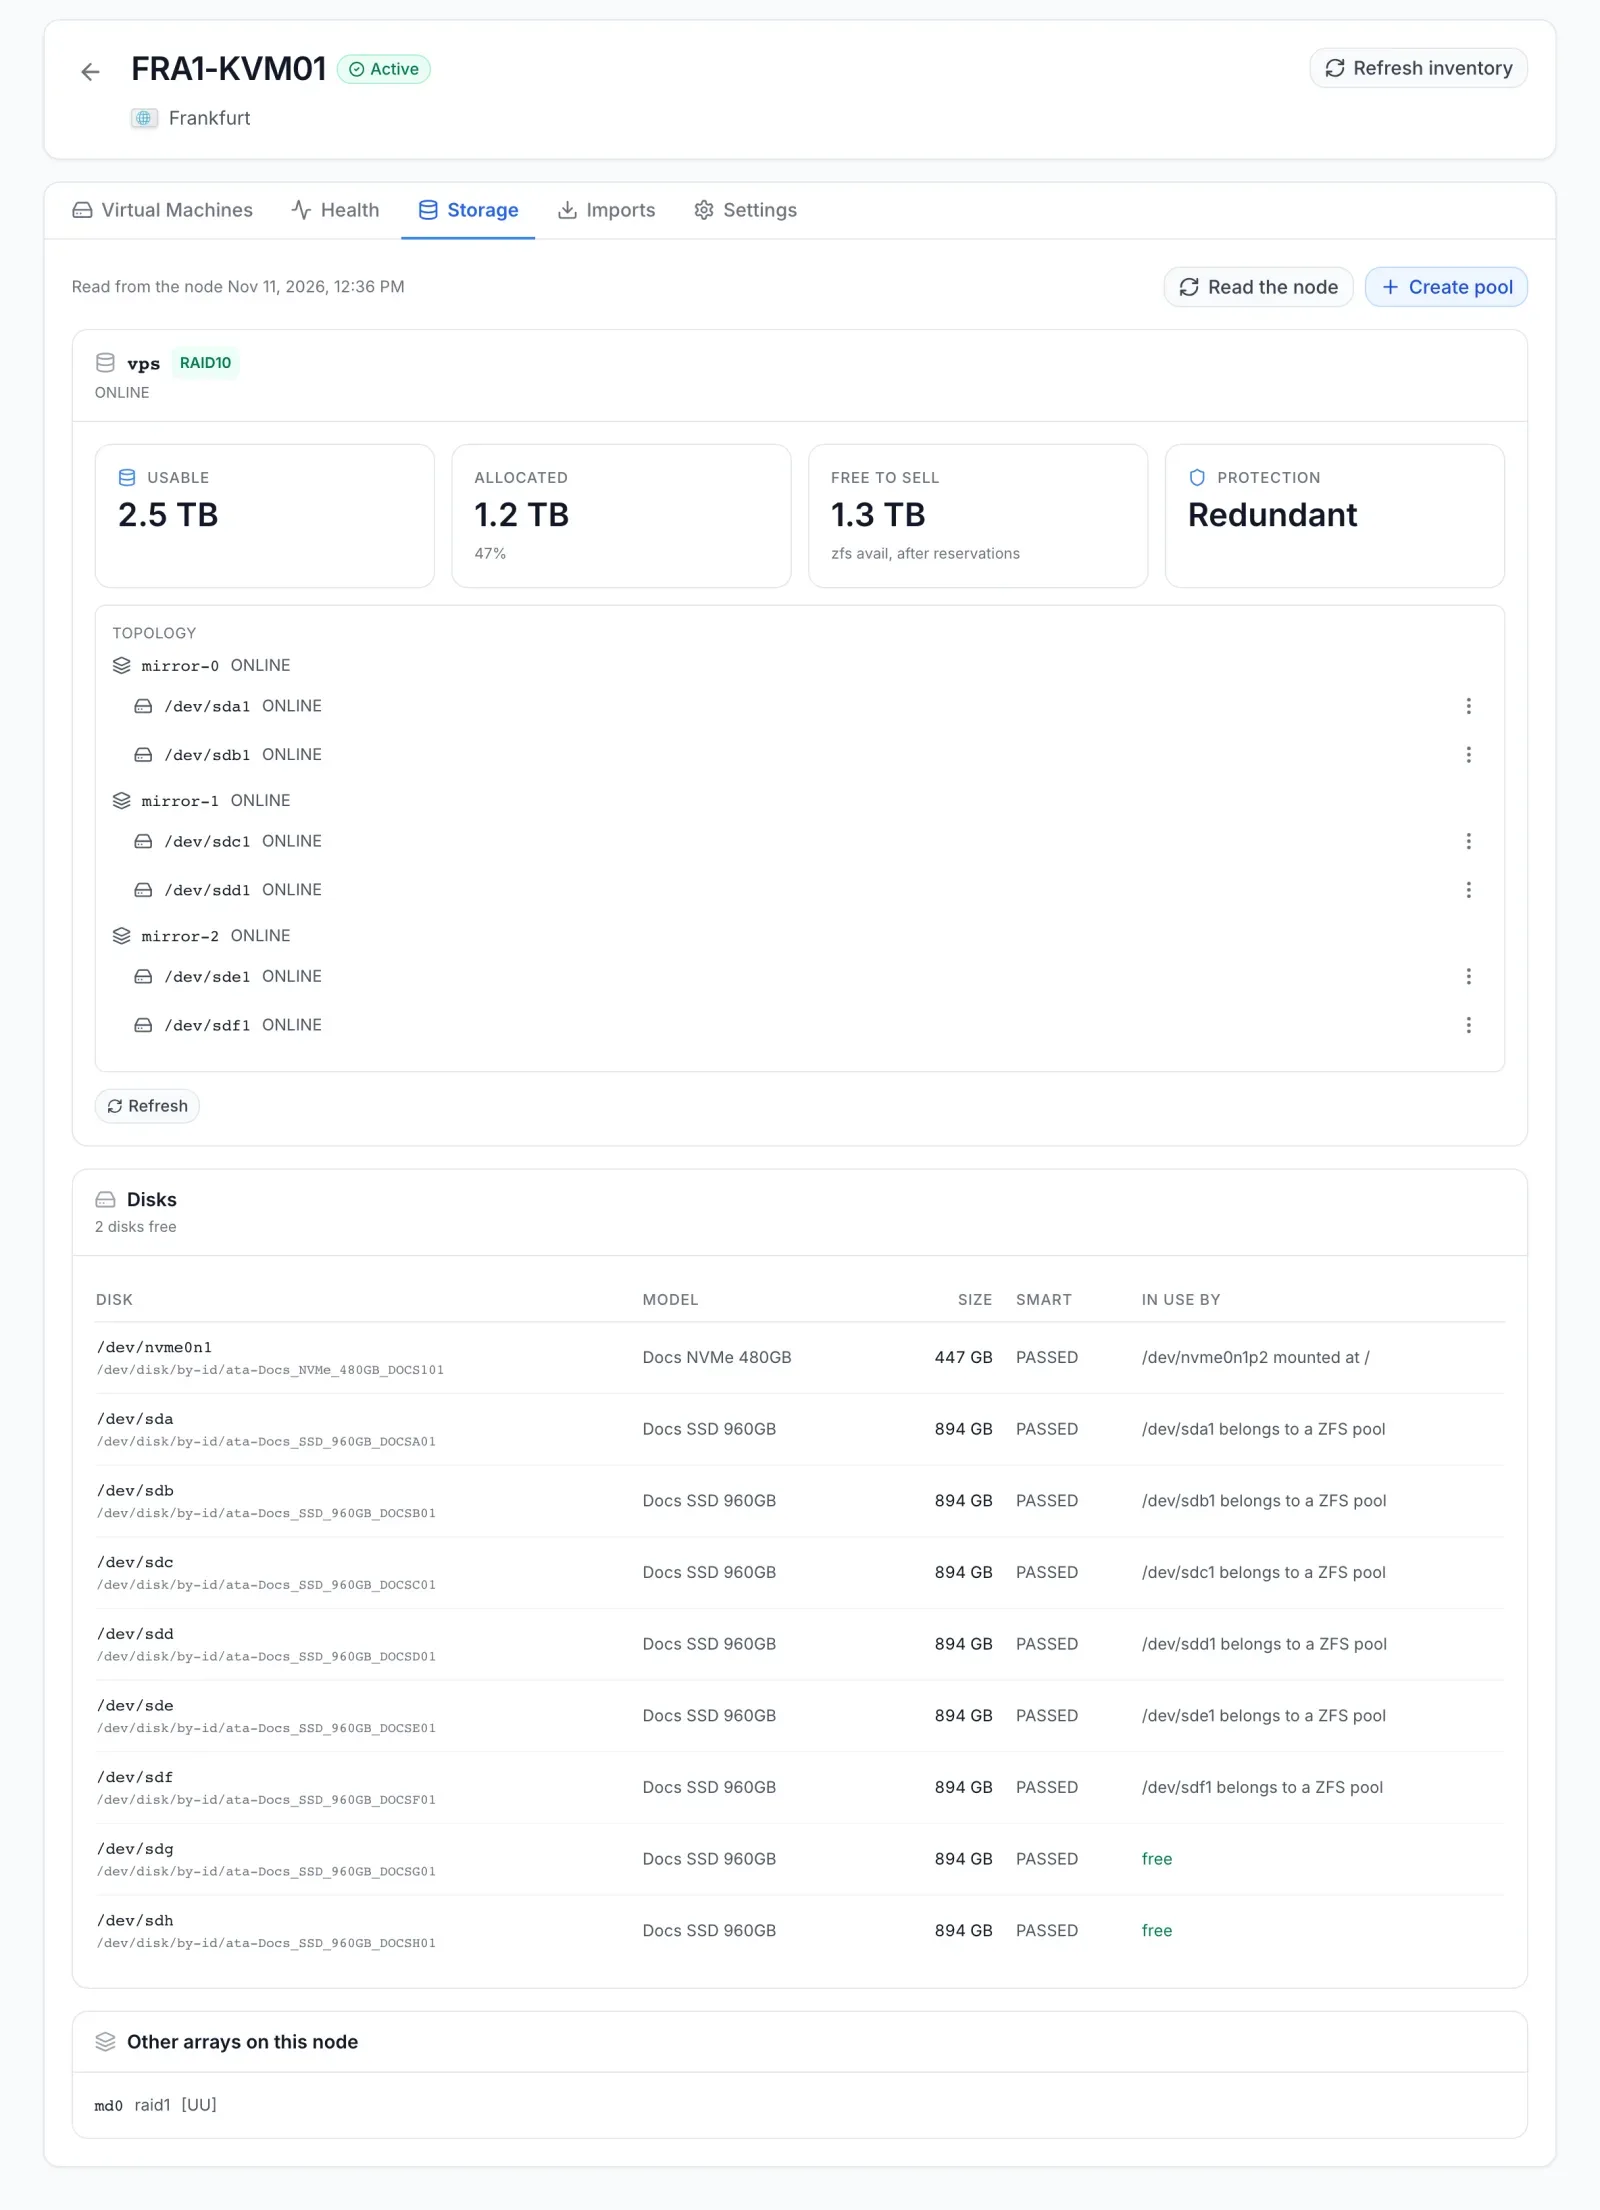
The pool card
Each ZFS pool gets its own card. The title shows the pool's name and a layout badge. The badge is green when the pool is redundant and red when it is not. Under the title is the pool's state, and any scrub, resilver or removal still running on it.
| Badge | What the pool is built from | Redundant |
|---|---|---|
| RAID10 | Two or more mirrors, with data spread across them | Yes |
| Mirror | One mirror | Yes |
| RAIDZ1, RAIDZ2, RAIDZ3 | RAIDZ groups with one, two or three disks' worth of parity | Yes |
| Stripe — no redundancy | Two or more single disks, with no copies | No |
| Single disk | One disk | No |
| Mixed | A mix of the above, for example mirrors plus a single disk | Only if every part has its own redundancy |
Four figures sit under the title:
- Usable: the pool's capacity. On a mirrored pool this already counts one copy only.
- Allocated: the space really written, with its share of the pool.
- Free to sell: the space still available after reservations (zfs avail, after reservations). This is the figure that answers how much more the node can take.
- Protection: Redundant or None.
Topology
The Topology box lists each group of disks in the pool (ZFS calls them vdevs, for example mirror-0) and the disks inside it, each with its state. A disk that is rebuilding shows a note such as (resilvering). If a disk has read, write or checksum errors, you see the three counters in amber. A rising checksum count often shows that a disk is returning bad data long before SMART reports a fault.
A disk that sits in the pool on its own, with no partner, is marked no partner and has an Add a mirror partner… button. See Adding a mirror partner. Log, cache, spare and special devices are listed below the data groups. They do not count towards redundancy.
Under the topology, Refresh reads the node again. Clear error counters appears only when a disk has checksum errors or the pool reports data errors.
Warnings
The tab puts red banners at the top for the problems that nothing else in the panel shows:
| Banner | What it means | What to do |
|---|---|---|
| This node has no disk redundancy (and No redundancy on the pool card) | At least one pool has a disk with no partner. Losing that one disk loses every VM on the pool. Capacity, latency and SMART all look normal on such a pool. | Give each listed disk a partner with Add a mirror partner…, or rebuild the pool as a mirror. |
| A mirror has lost a leg (and Running on one leg on the pool card) | A mirror or RAIDZ group has a member that is not ONLINE. The guests keep running, so nothing else will warn you before the partner fails too. | Replace the failed disk on the node now, then read the node again to check that the mirror is back to ONLINE. |
| Permanent data errors | ZFS reports blocks it could not repair. | Run a scrub on the node. Anything still listed afterwards is a block with no good copy left. |
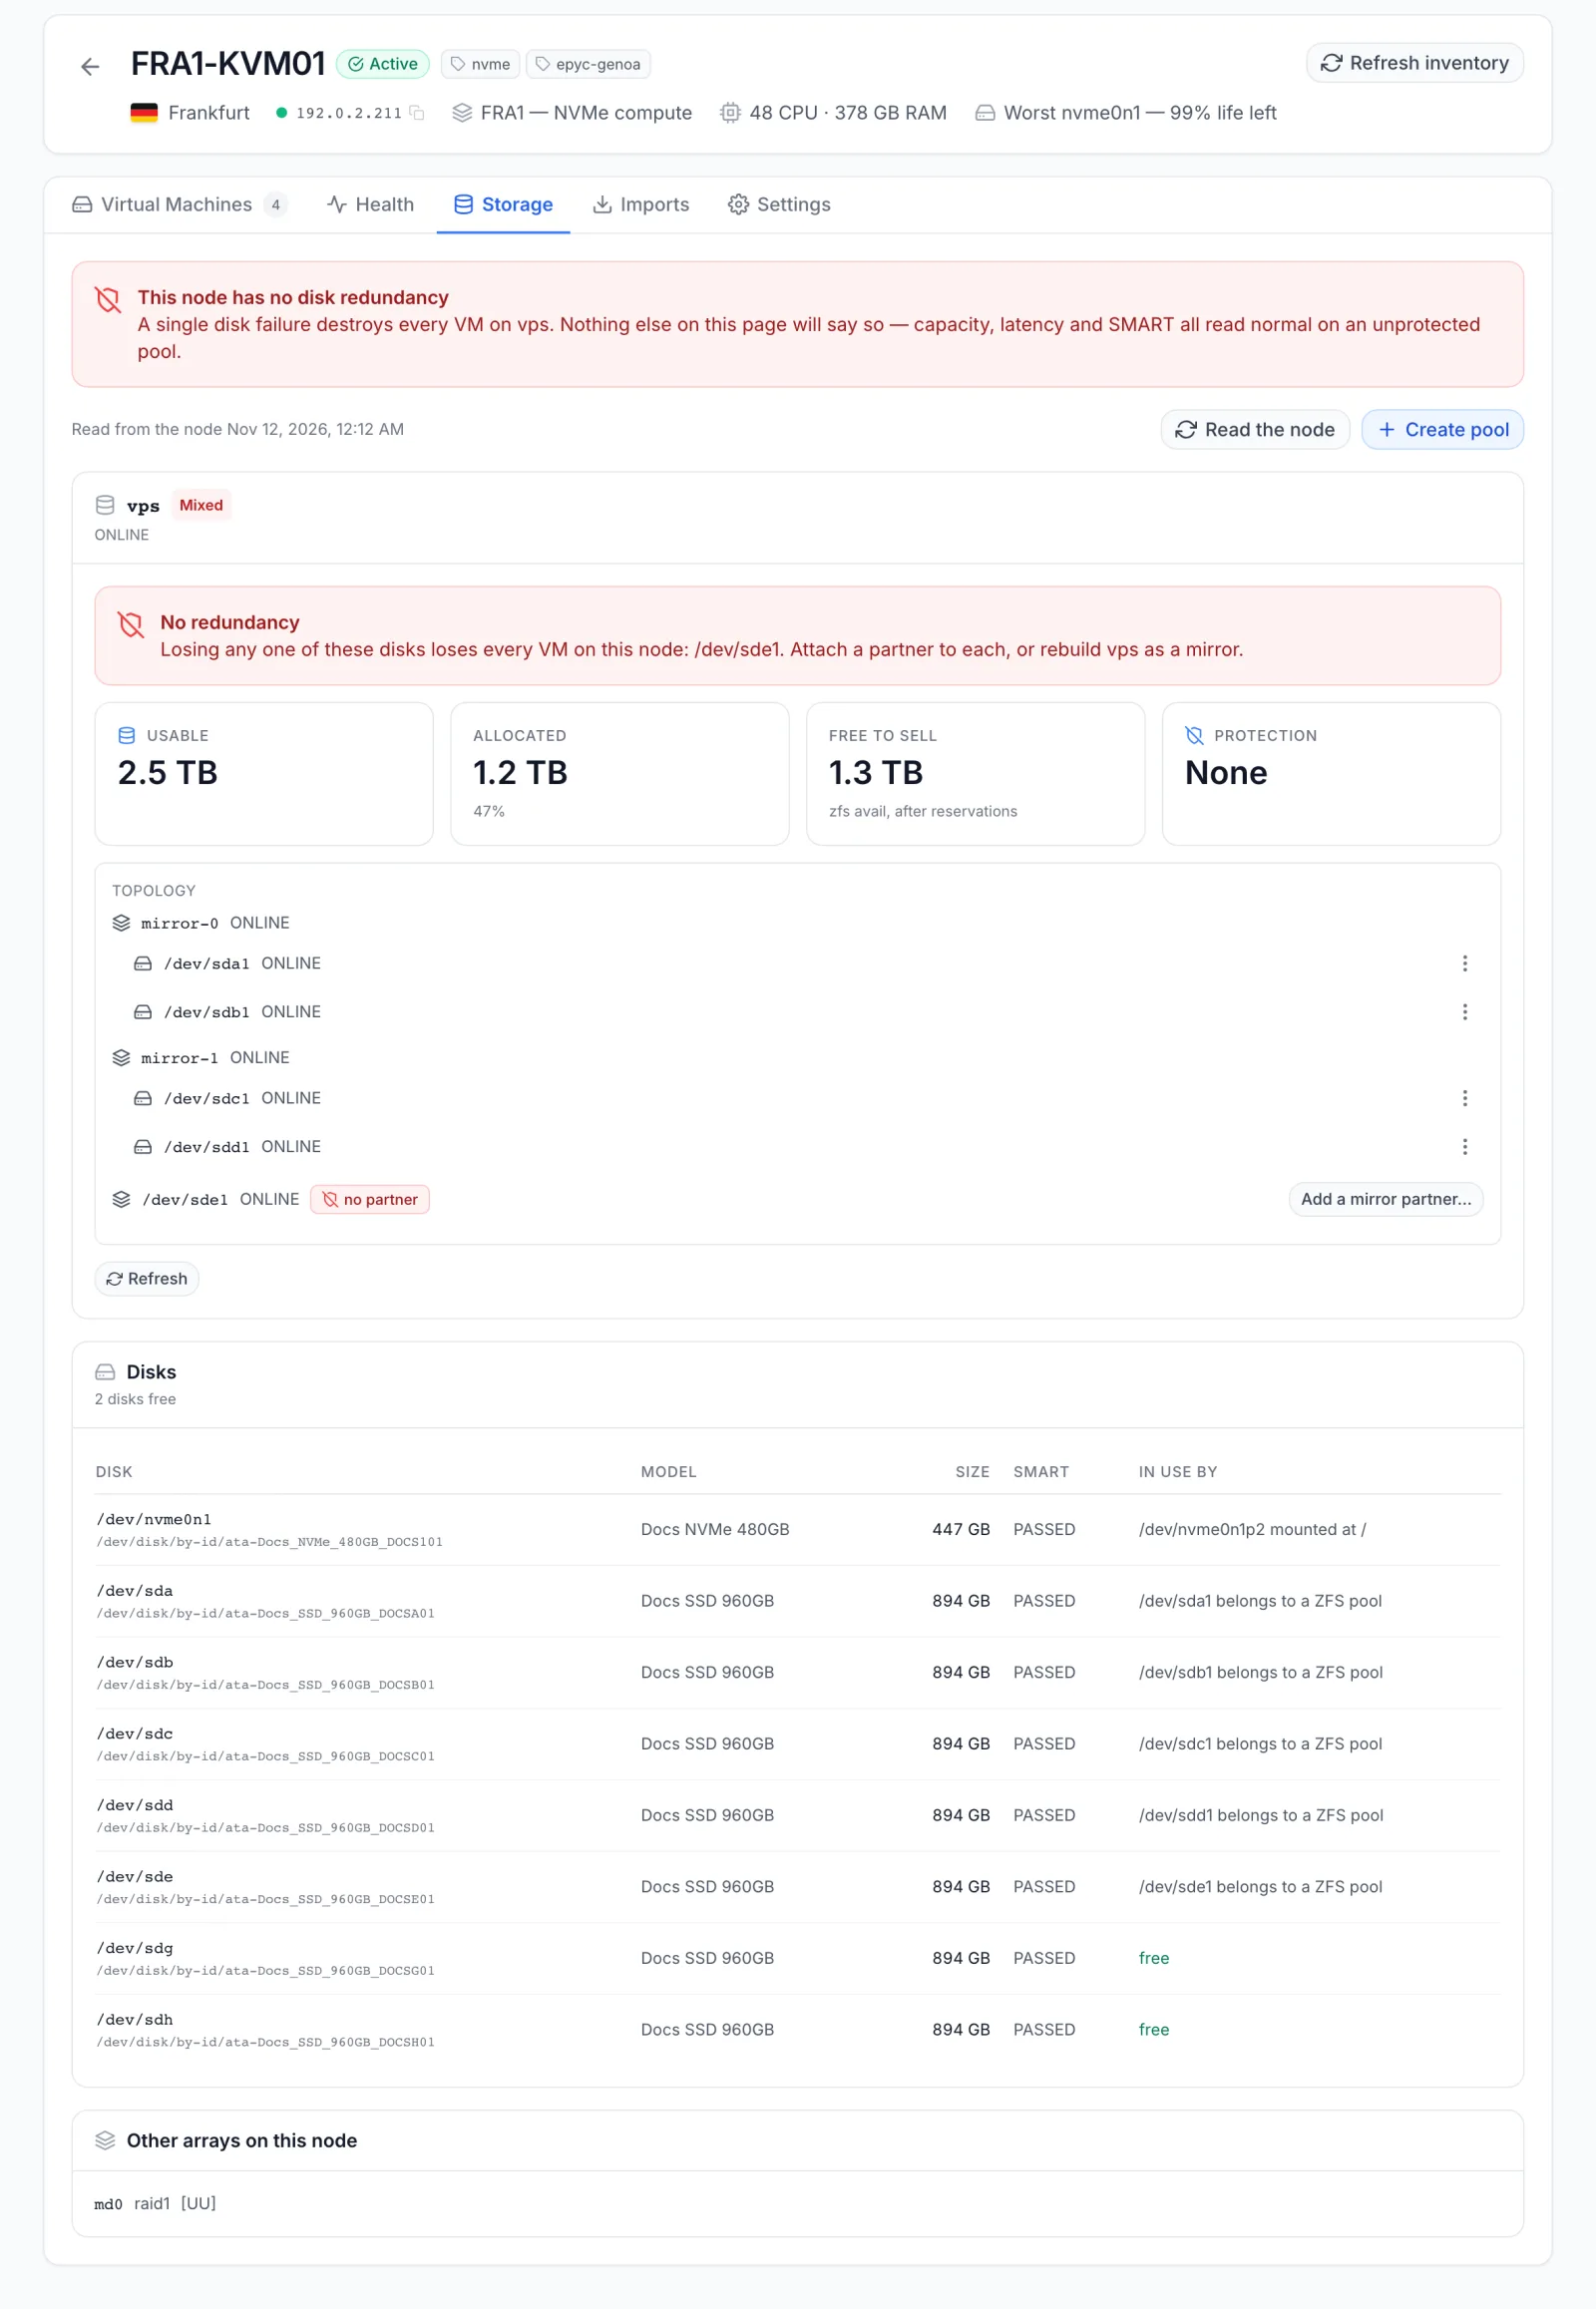
The disk table
The Disks card lists every physical disk the node reported, with the number of free disks next to its title. RAM disks, loop devices, optical drives and network block devices are left out.
| Column | What it shows |
|---|---|
| Disk | The device path, with its stable by-id name underneath |
| Model | The drive model, marked HDD for a spinning disk |
| Size | The disk's capacity |
| SMART | The SMART health result. Anything other than PASSED or OK is shown in red. Reallocated sectors are added in amber. |
| In use by | free, or the first reason the disk is in use. Hover for the full list. |
The reasons a disk counts as in use are: it or one of its partitions is mounted, is swap, belongs to a ZFS pool, is an LVM physical volume, is an mdraid member, or carries a filesystem signature.
Other arrays on this node lists mdraid arrays with their level and member map, marked degraded when a member is missing, and LVM volume groups with their free and total space.
Creating a pool
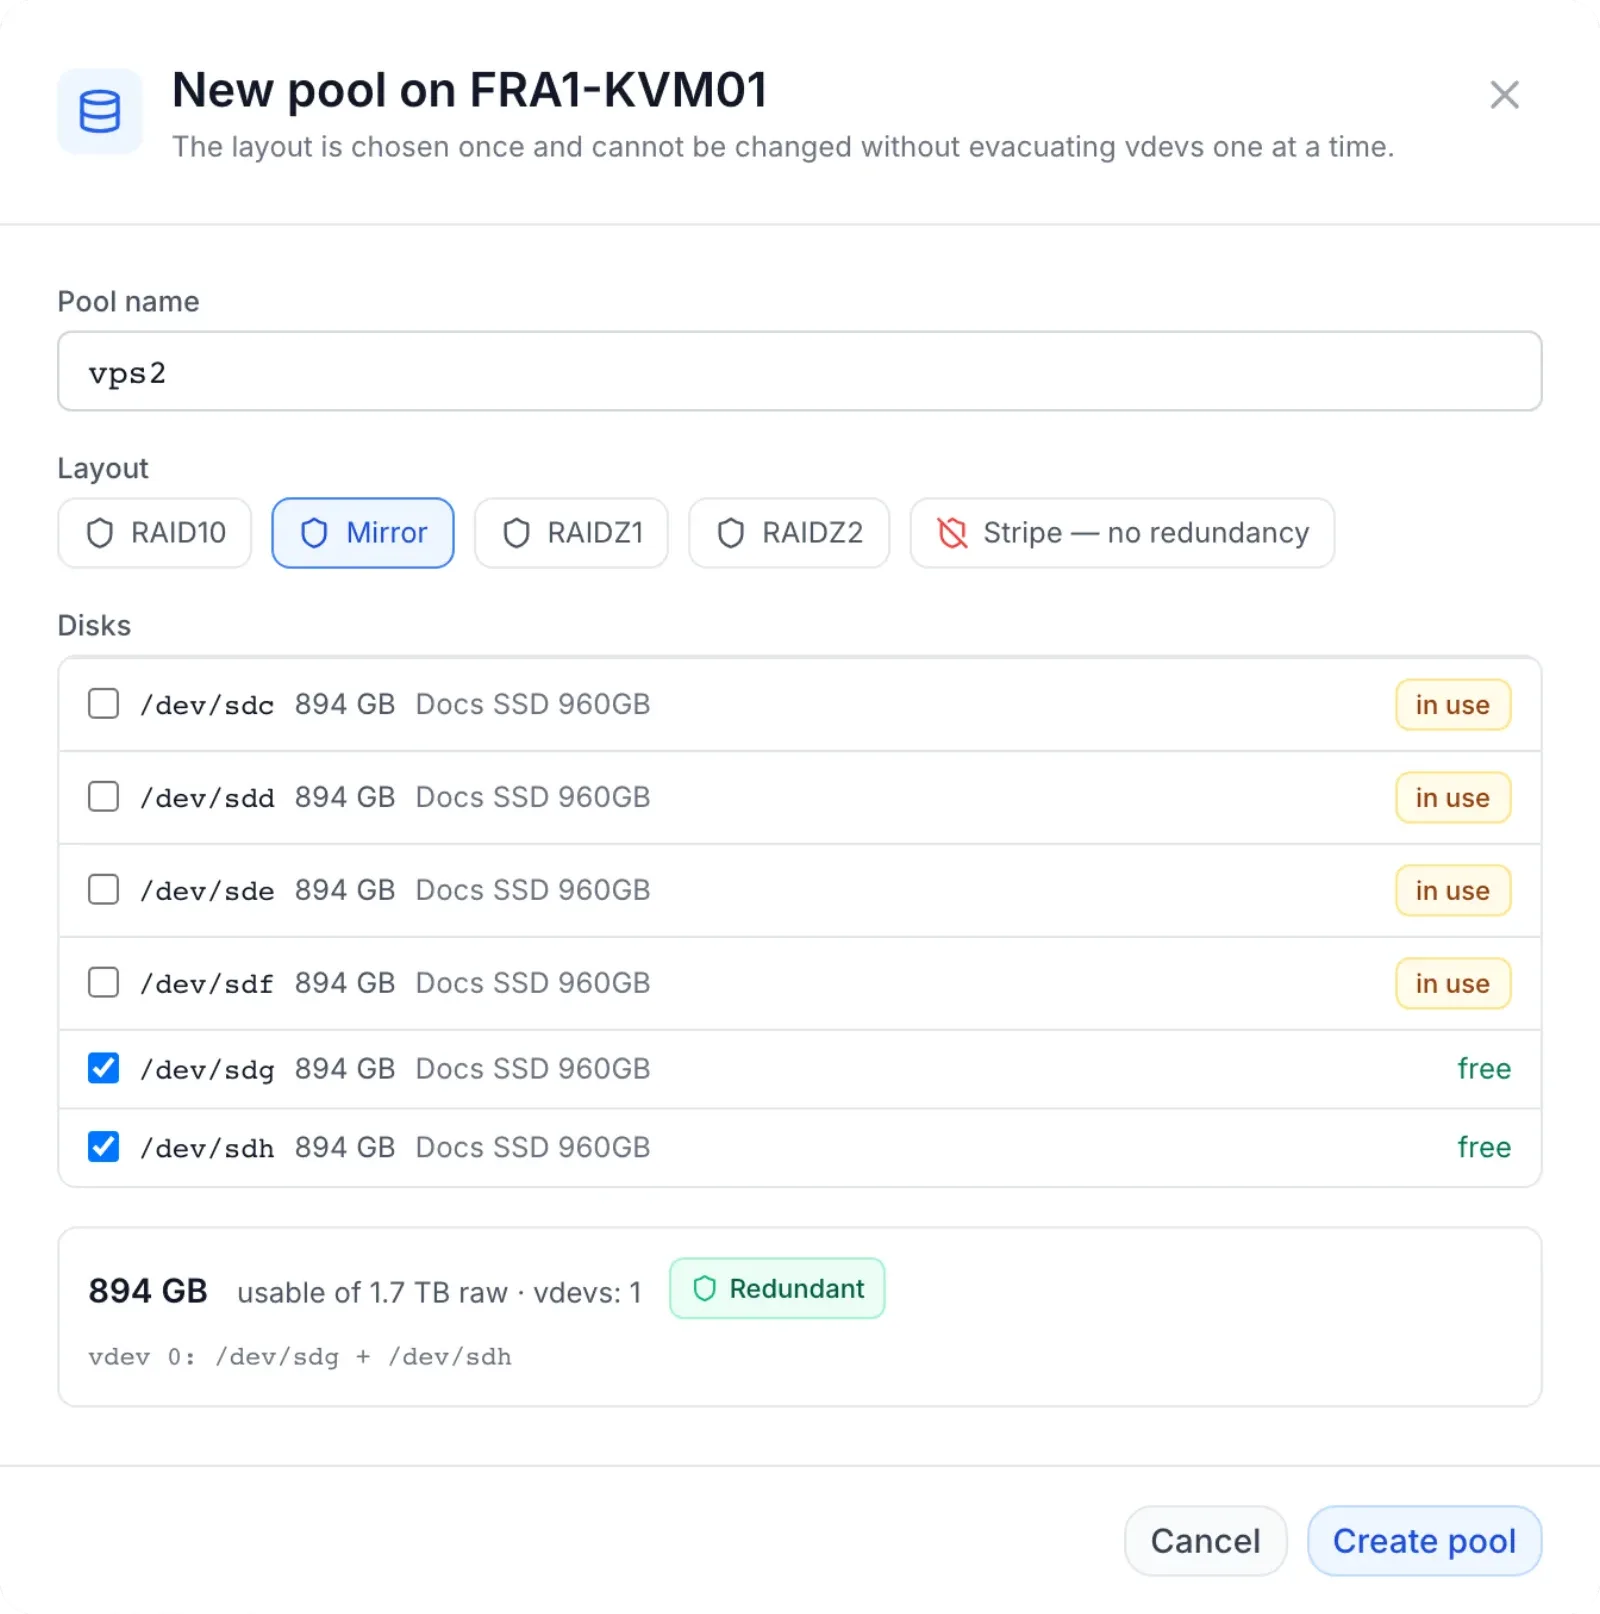
Use this to build a new pool on disks the node is not using yet, for example on a new node or after adding drives. You choose the layout once. The dialog warns that The layout is chosen once and cannot be changed without evacuating vdevs one at a time.
- Click Read the node first, so the dialog works from a fresh list of disks.
- Click Create pool. The button is greyed out while the node has reported no disks. The dialog is titled New pool on followed by the node's name.
- Enter a Pool name. It must start with a letter, can contain letters, digits, dots, underscores, colons and hyphens, and can be up to 64 characters long. A name the node already uses shows This node already has a pool with that name.
- Choose a Layout (see the table below).
- Tick the Disks to use. Each row shows the disk's size and model, a red chip if its SMART check did not pass, and free or in use.
- Check the preview: the usable capacity, the raw capacity and the number of vdevs, a Redundant or None chip, and one line per vdev showing which disks go together.
- If you ticked a disk that is in use, a red box These disks already hold data lists each one with the reason. Tick each disk again to confirm it may be wiped, then type the node's name in the box below. You are told how many disks will be erased.
- Click Create pool. You see Building followed by the pool name and on the node — follow it in the job list. The build runs as a job on the Jobs tab.
| Layout | Disks | How the dialog groups them | Usable space |
|---|---|---|---|
| RAID10 | At least 4, in pairs | Pairs, at least two mirrors | The smaller disk of each pair, added up |
| Mirror | At least 2, in pairs | Pairs | The smaller disk of each pair, added up |
| RAIDZ1 | At least 3 | All ticked disks in one group | The smallest disk × (number of disks − 1) |
| RAIDZ2 | At least 4 | All ticked disks in one group | The smallest disk × (number of disks − 2) |
| Stripe — no redundancy | At least 1 | One disk per vdev | Every disk, added up, with no copies |
The dialog pairs disks by size, largest first, so similar disks end up together. ZFS sizes a mirror by its smaller member, so a 2 TB disk paired with a 1 TB disk wastes a terabyte. A disk that does not complete a pair is left out, and the dialog says how many. The preview can add these warnings:
- Vdevs of unequal width: ZFS will spread data unevenly across them.
- A stripe has no redundancy: losing any one disk loses every VM on the node.
- A vdev mixes disk sizes: ZFS uses the smallest, and the rest is wasted.
- Some selected disks are not in the node's last reading: read the node again before relying on the figures.
The node checks every disk again before it builds the pool. It refuses a disk that is not a whole disk, a disk that holds a virtual machine's disk, a disk in use that you did not confirm, and a disk whose SMART check did not pass. It also refuses a pool name that already exists on the node. Old filesystem signatures are cleared from the chosen disks before the pool is created.
Adding a mirror partner
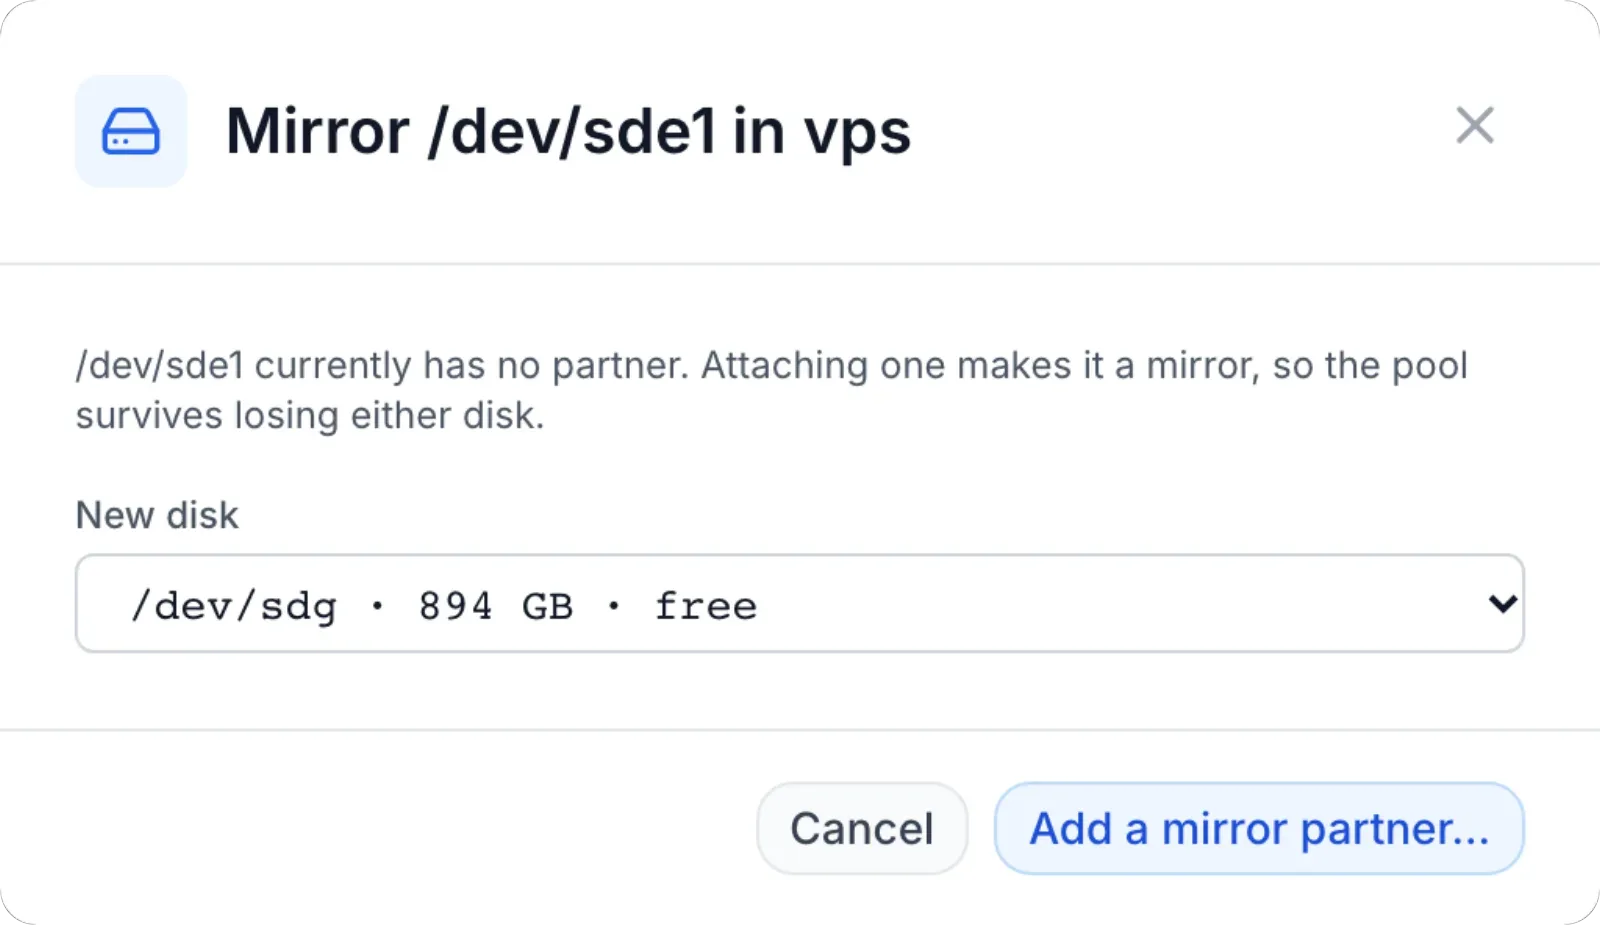
A disk marked no partner has an Add a mirror partner… button. Attaching a second disk to it turns that part of the pool into a mirror, so the pool survives losing either disk.
- Click Read the node, so the list of disks is current.
- Click Add a mirror partner… next to the disk. The dialog is titled Mirror followed by the disk and the pool.
- Choose the New disk. Each disk in the list shows its size and free or in use. If the disk's SMART check did not pass, the dialog warns that the node will refuse it.
- If you pick a disk that is in use, a red box shows why. Tick it to confirm the disk may be wiped, and type the node's name.
- Click Add a mirror partner…. You see Attaching the partner — ZFS is resilvering onto it now.
Old filesystem signatures are cleared from the new disk first. The work runs as a job on the Jobs tab, and the job follows the rebuild for up to 45 minutes. A rebuild on a full disk can take longer. The pool stays in service throughout, and the topology shows the new disk as resilvering until it is done. Read the node again afterwards to see the new topology.
Clear error counters, under the pool's topology, resets the read, write and checksum counters on the pool. It repairs nothing; run a scrub for that. Nothing on the Storage tab can destroy a pool or remove a whole group of disks from it.
Which pools a node sells from
A node can report several pools, for example the ZFS pool and an image directory on the system disk. You choose which ones new VPS are built in on the node's Settings tab, in the Placement & overselling card, under Storage pools this node sells from:
- Nothing ticked: a VM is built in whichever pool is biggest when it is created, and capacity counts the largest pool.
- One or more ticked: every VM on the node is built in one of them, and capacity and the free-space floor count only those pools. Default pool sets where a VM goes when nothing names a pool; first ticked uses the first one in the list.
Each pool shows its free space, and its state in red when it is not ONLINE. If the list is empty you see This node has not reported any storage pool yet — probe the cluster first. The same pools decide where the fill limits below are measured. See VPS clusters for the rest of the Settings tab.
When a pool fills up
VPS disks are usually thin: a guest uses only what it writes, so a node can sell more disk than its pool holds. That is fine until the guests together write more than the pool has. When a pool is completely full, every guest on it pauses. The settings below in VPS → Settings deal with this. Each is measured on the pool's real fill (the data written), not on the disk space sold.
| Setting | Section | What it does |
|---|---|---|
| Stop selling at pool fill | Placement & sell ceilings | A node takes no new VPS disks once the pool it builds in really holds this share of its space (0–100%). It applies with or without a sell ceiling. 0 switches it off. |
| Storage pool fill notification | Alert thresholds | Staff are notified when a node's pool really holds this share of its space, again when it reaches the stop-selling level, and once when it drops back. 0 switches it off. |
| Move VPS off a node whose disk is filling up | Placement & sell ceilings | Switches on automatic moves, described below. |
| Start moving at pool fill | Placement & sell ceilings | Moves start when the node's selling pool really holds this much (50–98%). |
| Move until pool fill is back at | Placement & sell ceilings | Moves continue until the pool is back at this fill (30–95%). A destination must stay under it with the moved disk at full size. |
| Also start below free space | Placement & sell ceilings | Moves also start when a pool has less than this many GB free, whatever its percentage. Useful on small pools. 0 switches it off. |
| Transfer cap per move | Placement & sell ceilings | Caps the speed of one automatic move in MiB/s, so customers on both nodes keep their bandwidth. 0 means no cap. At 200 MiB/s a 100 GB disk moves in about 9 minutes. |
Stopping sales does not stop the guests already on the node from writing. A VPS that would put a new disk on a pool past the stop level is refused with a message that names the pool, its fill and the stop level. The rest of the VPS Settings page is covered in VPS settings.
Automatic moves
With Move VPS off a node whose disk is filling up on, the panel checks every 5 minutes. For each node whose selling pool is past the start level, or below the free-space floor, it live-migrates one running VPS to another node. It picks the VPS that brings the pool back to the target with the smallest transfer. The guest keeps running during the move.
A destination node must meet all of these:
- It can keep every one of the VPS's IP addresses. An automatic move never changes a customer's IP.
- It sells from a pool with the same name and the same disk format, so the disk lands in its VM storage.
- It stays under the target fill with the VPS's full disk size on it.
- It would accept the VPS as a new sale: memory, CPU and disk limits, the stop-selling level, not draining, agent online.
To keep moves gentle, only one move leaves a node at a time, a node receives only one automatic move at a time, and no more than two automatic moves run at once. A VPS that was moved stays where it landed for 24 hours. A VPS whose move failed is not tried again for 6 hours. A VPS that would free less than 1 GB is never moved.
The same check resumes guests that were paused because their pool was full, once that pool has at least 10 GB free again. Guests you paused yourself are left alone.
Notifications
Storage events appear in the admin notification bell (see Notifications). Each one names the node:
- storage pool N% full, when a pool reaches the notification level.
- storage full — new VPS disks stopped, when it reaches the stop-selling level.
- storage back to normal, when it drops below the level again. A pool must fall 2 percentage points below a level before it counts as having left it, so a pool hovering on the line does not notify every few minutes.
- RAID degraded, with the array names, when an array on the node loses redundancy, and RAID redundancy restored when every array is healthy again.
- For automatic moves: disk N% full — moving a VPS to another node, the VPS moved to its new node, automatic move failed, resumed guests paused by a full disk, and nothing can be moved automatically with the reasons. That last one repeats every 6 hours while the problem lasts.
What the customer sees
Nothing on the Storage tab is shown to customers. An automatic move keeps the VPS running and keeps its addresses. If a pool fills completely before anything frees space, the customer's VPS pauses until the pool has room again.
Troubleshooting
The panel checks what it can before it sends a request, and shows those messages in the dialog. The node checks everything again against a fresh reading of its disks; its messages appear on the failed job on the Jobs tab.
| Message | Cause and fix |
|---|---|
| Could not read this node’s storage, or a message starting Storage probe failed | The node did not complete the reading. Check that the agent is online on the node's page, then read the node again. |
| Cluster has no provisioning agent attached | The node has no agent. Attach one before using the Storage tab. |
| Create pool is greyed out | The node has reported no disks. Click Read the node first. |
| This node already has a pool called '…' — pick another name | Choose a pool name the node does not use yet. |
| … is in use (…) — confirm it explicitly to wipe it | You picked a disk that holds data without confirming it. Tick the disk in the red box and type the node's name, or pick a free disk. |
| This will erase … Type the cluster name (…) to confirm. | The typed name does not match the node's name exactly. |
| … is not a whole disk on this node | The disk is not in the node's last reading, or it is a partition. Read the node again and pick a disk from the list. |
| raid10 needs at least two mirror vdevs — one mirror is a mirror | Tick at least four disks for RAID10, or choose Mirror. |
| … reports SMART health '…' | The node will not build on or copy onto a disk whose SMART check did not pass. Use a healthy disk. |
| A pool or disk job fails with cluster is FROZEN (over licensed limit) | A frozen node refuses storage readings as well as pool and disk changes until it is unfrozen. Read the node then fails with this same message. See VPS clusters. |
| '…' storage pool '…' is N% full (new disks stop at N%) — a … disk does not fit. | The pool is past Stop selling at pool fill. Free space on the node, add disks to the pool, or raise the level in VPS → Settings. |
| nothing can be moved automatically | No VPS on the node meets the rules for an automatic move. The notification gives up to three reasons, for example that a VPS would need new addresses, or that no other node sells from a pool with that name. Move a VPS by hand (see VPS instances) or add disks. |
Related articles
- VPS clusters: the rest of a node's page, including its Settings tab.
- VPS settings: every setting on the VPS Settings page.
- VPS jobs: following a pool build or a new mirror partner.
- VPS instances: moving a VPS to another node by hand.