
Your Game Server Control Panel
Control your game server from the client panel: power, live console, files, backups, schedules, mods, settings, SFTP access and paid upgrades.
Every game server you buy from your host comes with its own control panel inside the client panel. From one page you can start and stop the server, watch its console and type commands, edit its files, take and restore backups, run restarts on a timetable, install mods, change the game's settings, get SFTP details and buy extra resources. This article walks through each part of that page.
Which game servers this covers. This page belongs to game servers that your host runs on its own machines with FluxBilling's game hosting. Hosts switch it on under Settings → General → Feature Toggles → Game Hosting (see Game Hosting overview). Game servers sold through a plugin such as Pterodactyl show that plugin's own controls instead; see Pterodactyl game servers.
Opening your server
- Sign in to the client panel and click My Services.
- Click your game server in the list.
The service page opens. Below the usual service details (billing cycle, next due date, cancellation; see Managing your services) you find three blocks, stacked one above the other:
- the Server status bar, with the power buttons;
- a strip of facts: the Connect address, what the server is Running, and its Memory, Processor, Disk and either Player slots or Backups;
- one card with nine tabs: Console, Files, Backups, Schedules, Mods, Network, Settings, File access and Upgrades.
The page opens on the first tab that is available, which is normally Console. At the bottom of the page you see Server ID followed by a short code. Quote it when you contact your host about this server.
Server status and power
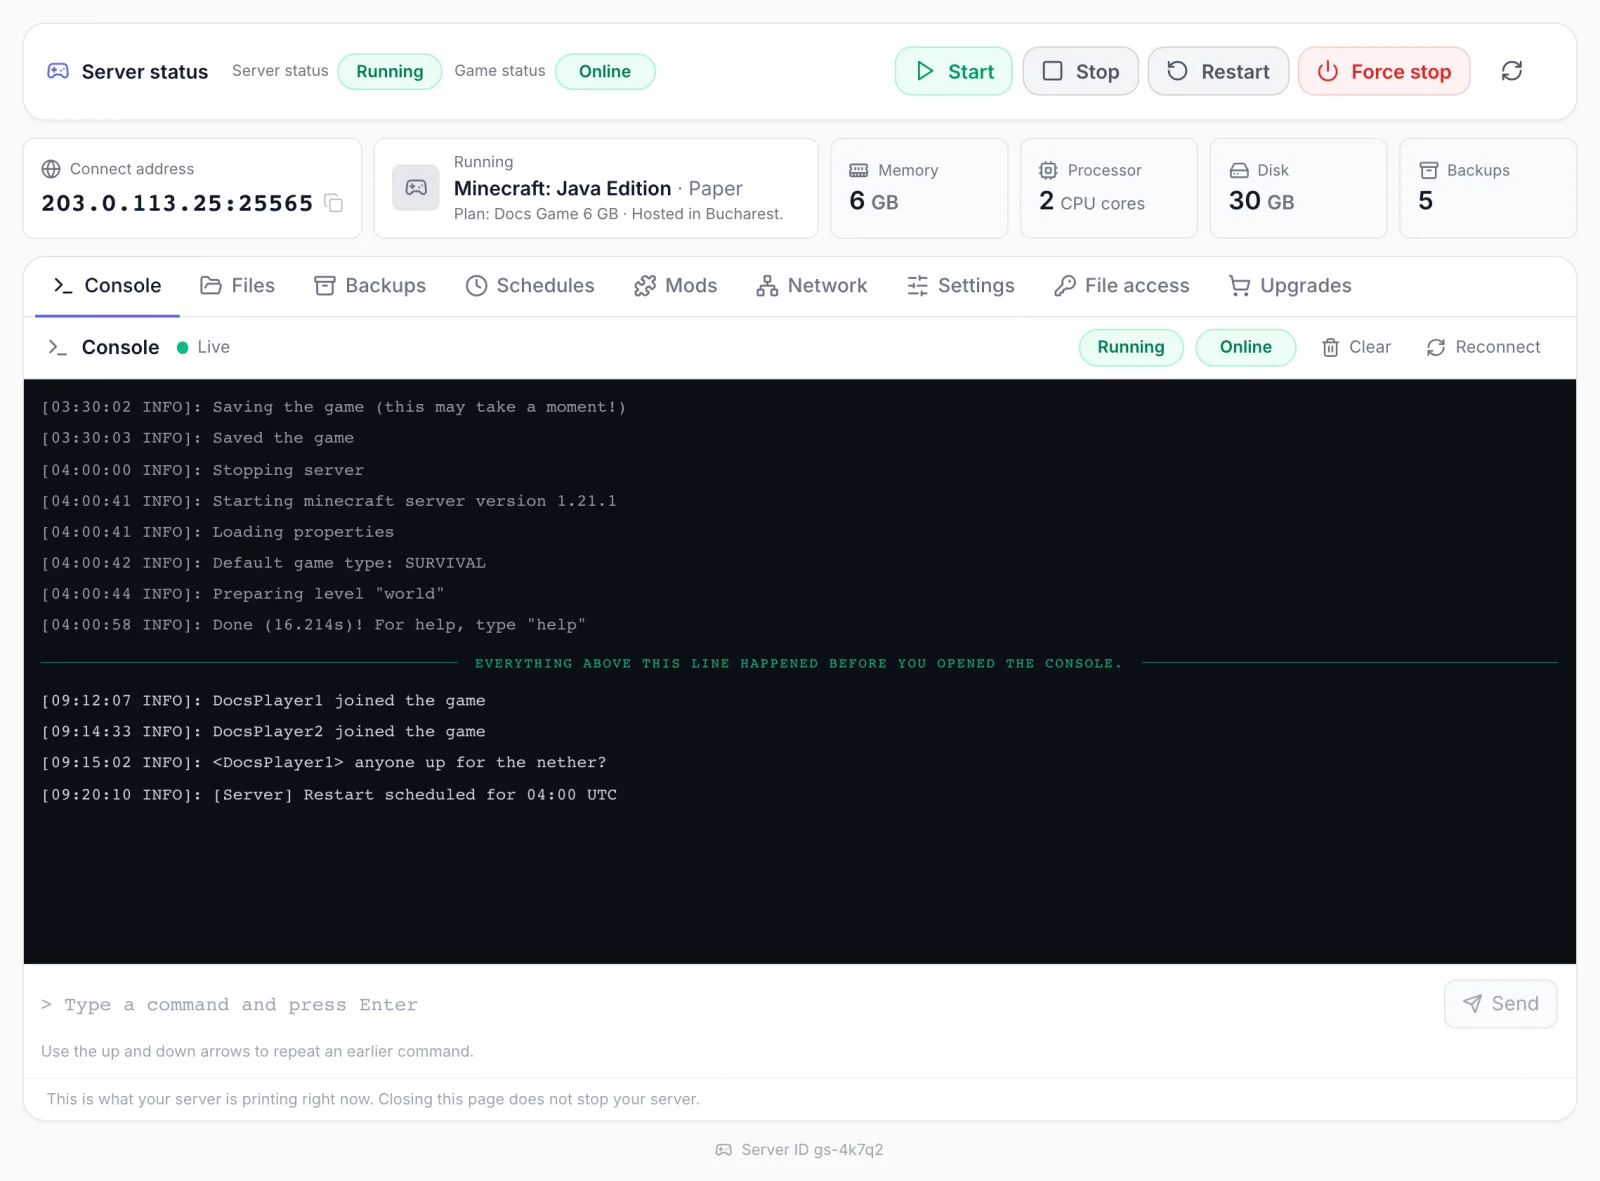
The status bar shows two badges, because they answer two different questions:
| Badge | What it tells you | Values you can see |
|---|---|---|
| Server status | What the panel is doing with your server. | Creating, Installing, Installation failed, Running, Stopped, Suspended, Error, Not linked to a service |
| Game status | Whether the game itself is up, which is not the same as the server being switched on. | Starting up, Online, Offline, Crashed, Could not be read, or Not reported yet on a brand-new server |
If the server is Running but the game is Offline or Crashed, a yellow box reads “Your server is on, but the game is not”. That is usually a crash, a bad config file or not enough memory. Open the Console tab: it holds the last lines the game printed.
While the server is Installing, the page checks for progress on its own every 15 seconds, so you can leave it open until the install finishes.
The power buttons sit at the right of the status bar:
- Start starts a stopped server.
- Stop shuts the game down cleanly.
- Restart stops and starts it again.
- Force stop kills the server at once, without letting the game save. Use it only when Stop does not work.
After you click a button, the panel says “That has been sent to your server.” The round arrow button at the far right (Refresh) reloads the status. If the buttons are greyed out, a line under the bar explains why (see When a tab is locked).
The facts strip
- Connect address: the address and port to give your players. Click the copy icon to copy it. It stays the same for as long as the service is active. If it is greyed out with “This address is not accepting players at the moment”, the server cannot take players right now, for example because the service is suspended.
- Running: the game, the version (shown as Version not recorded if it is unknown), your plan name and the location the server is hosted in.
- Memory: the memory the server may use, plus swap if your plan includes any.
- Processor: shown in CPU cores when your share is at least one whole core, otherwise as a percentage. Hover it to read “Your server may use up to N% of one CPU core at a time”.
- Disk: the disk space for your server's files.
- Player slots when your plan has a player limit; otherwise Backups, the number of backup slots your plan includes (None included when there are none).
Console
The Console tab is a live view of what your server prints, with a box to type commands into. Opening the tab connects it; leaving the tab disconnects it. Closing the page does not stop your server.
- The header shows the connection state: Connecting, Connected, Live, Reconnecting, Disconnected or Connection problem. You can type once it reads Live.
- When you open the console, it first shows recent output. A line reading “Everything above this line happened before you opened the console.” separates that history from new output.
- Type a command in Type a command and press Enter and press Enter or click Send. Use the up and down arrow keys to repeat one of your last 50 commands.
- Clear only clears your screen. Nothing is deleted on the server.
- Reconnect opens a fresh connection.
- If you have scrolled up, click Jump to the newest line to return to the bottom.
Limits that keep the console responsive:
- The page keeps the newest 2,000 lines. Older lines scroll out of view, and a note says how many.
- A line longer than 4,096 characters is cut off and marked.
- A command is sent as a single line of up to 2,048 characters. Line breaks are turned into spaces.
- You can send up to 8 commands per second. Faster than that, the panel says “That was too many commands at once. Wait a moment and try again.”
The console may also show notices from your server's machine. For example, “Your server is printing faster than this page can keep up with, so output is being held back for a moment.” If a server never stops printing, the machine stops it, and you see “Your server was stopped because it would not stop printing. That is almost always a crash loop or a broken config file.”
Files
The Files tab is a file manager for your server, in the browser. Click a folder to open it, use the path at the top (starting at Server files) to go back up, or click Up one folder.
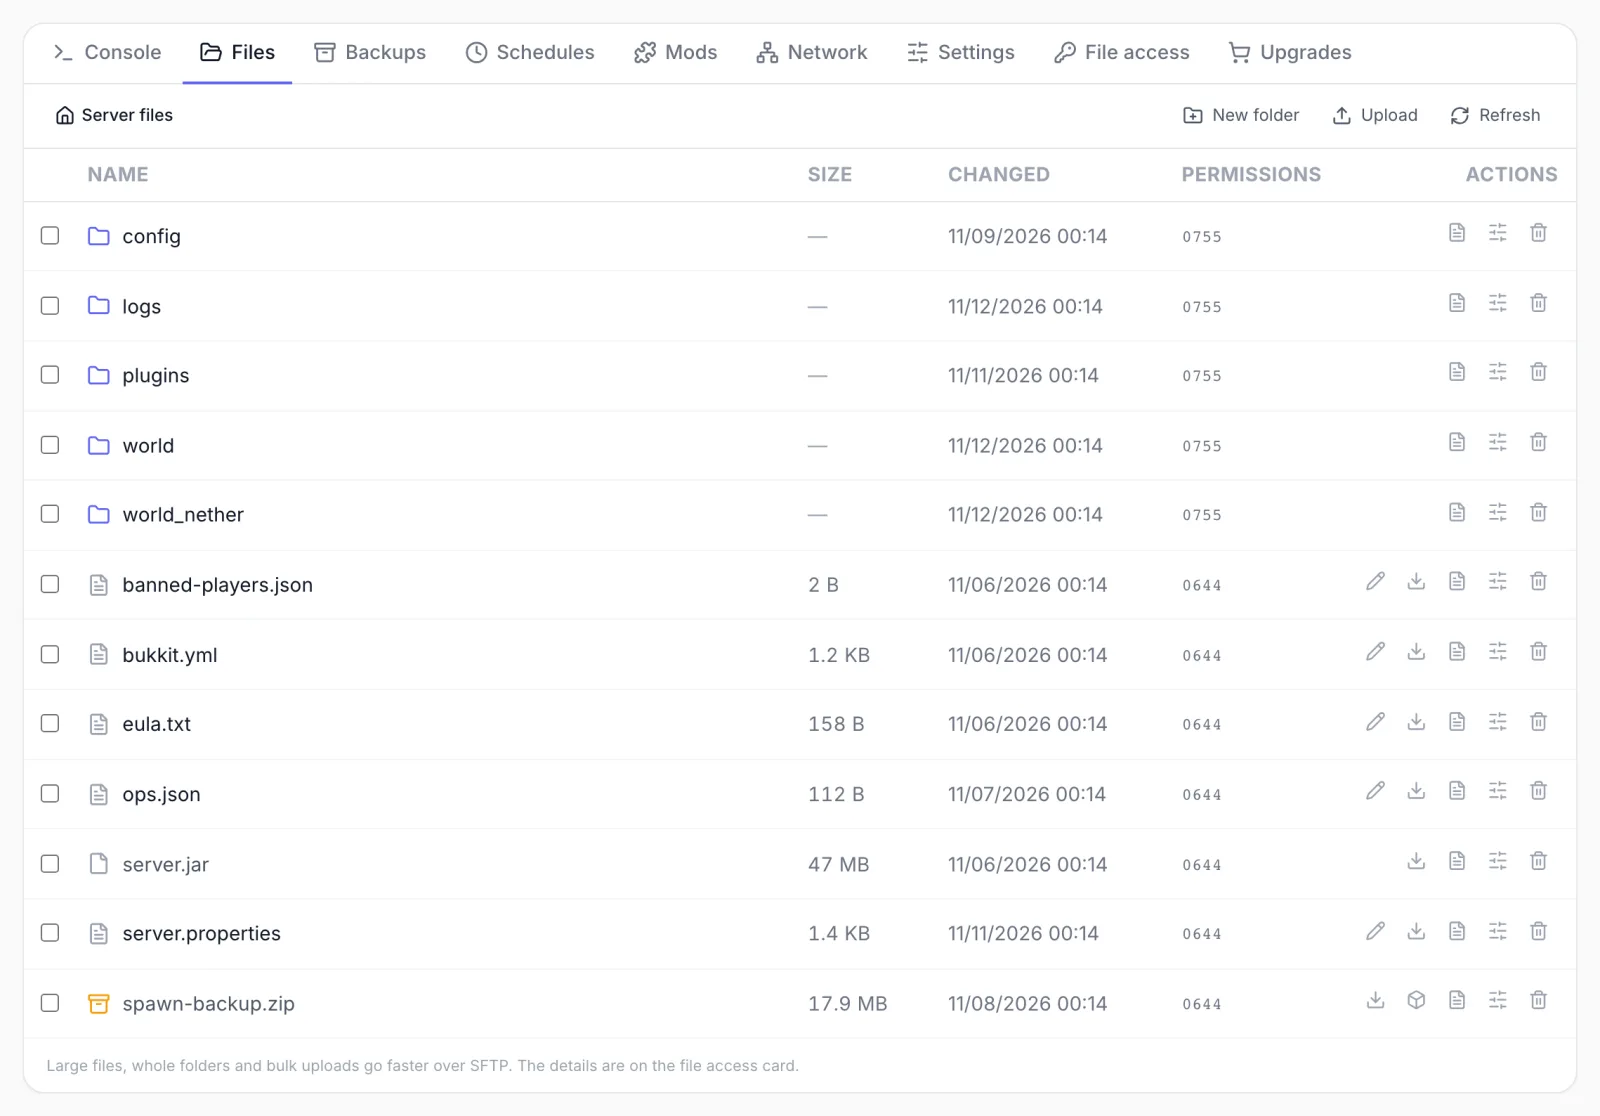
The toolbar has New folder, Upload and Refresh. Each row shows Name, Size, Changed and Permissions, and has these actions:
| Action | Shown for | What it does |
|---|---|---|
| Edit | Text files, such as .properties, .yml, .json, .cfg, .txt, and files like eula or ops | Opens the file in an editor. Click Save to write it back, or Close. If you close with unsaved changes, the panel asks whether to Discard changes. |
| Download | Files | Downloads the file to your computer. |
| Extract here | Archives (.zip, .tar, .tar.gz, .tgz, .gz, .bz2, .xz, .zst, .rar, .7z) | Unpacks the archive into the current folder. Files with the same name are overwritten. |
| Rename | Files and folders | Asks for a New name. Names cannot be empty or contain a slash. |
| Permissions | Files and folders | Changes the permission number, three or four digits such as 0644. Leave it alone unless you know you need to change it. |
| Delete | Files and folders | Deletes after you confirm. This cannot be undone from the panel, so take a backup first if you are not sure. |
Tick the boxes at the left of several rows to work on them together. A bar shows how many are selected and offers Create archive (you enter an Archive name; large archives take a few minutes), Delete and Clear selection.
Size limits in the browser:
- Upload and Download handle files up to 4 MiB each. You can pick several files to upload at once; they are sent one after another.
- The editor loads up to 256 KiB of a file. For a longer file it shows “You are seeing part of this file” and turns saving off, because saving would cut off everything below what you can see.
- For anything bigger, and for whole folders, use SFTP (see File access).
Some rows carry a label:
- Protected by your host: your host protects this file for this game, so it cannot be changed from the panel. The file is still yours over SFTP.
- From before a restore: a folder whose name starts with
.fluxbilling-prerestore-. A restore that did not finish left your previous files here instead of deleting them. It may be the only copy of what was on your server before. Take out what you need, then delete the folder to free the space. - Shortcut to another location: a link to another place on the server.
When a banner reads Read-only, you can look at files but not change them. That is normal while a server is suspended or still installing, and for team members without the Manage Services permission.
Backups
The Backups tab keeps copies of your server's files, so you can put them back after a bad update, a broken mod or a wipe you did not mean to run.
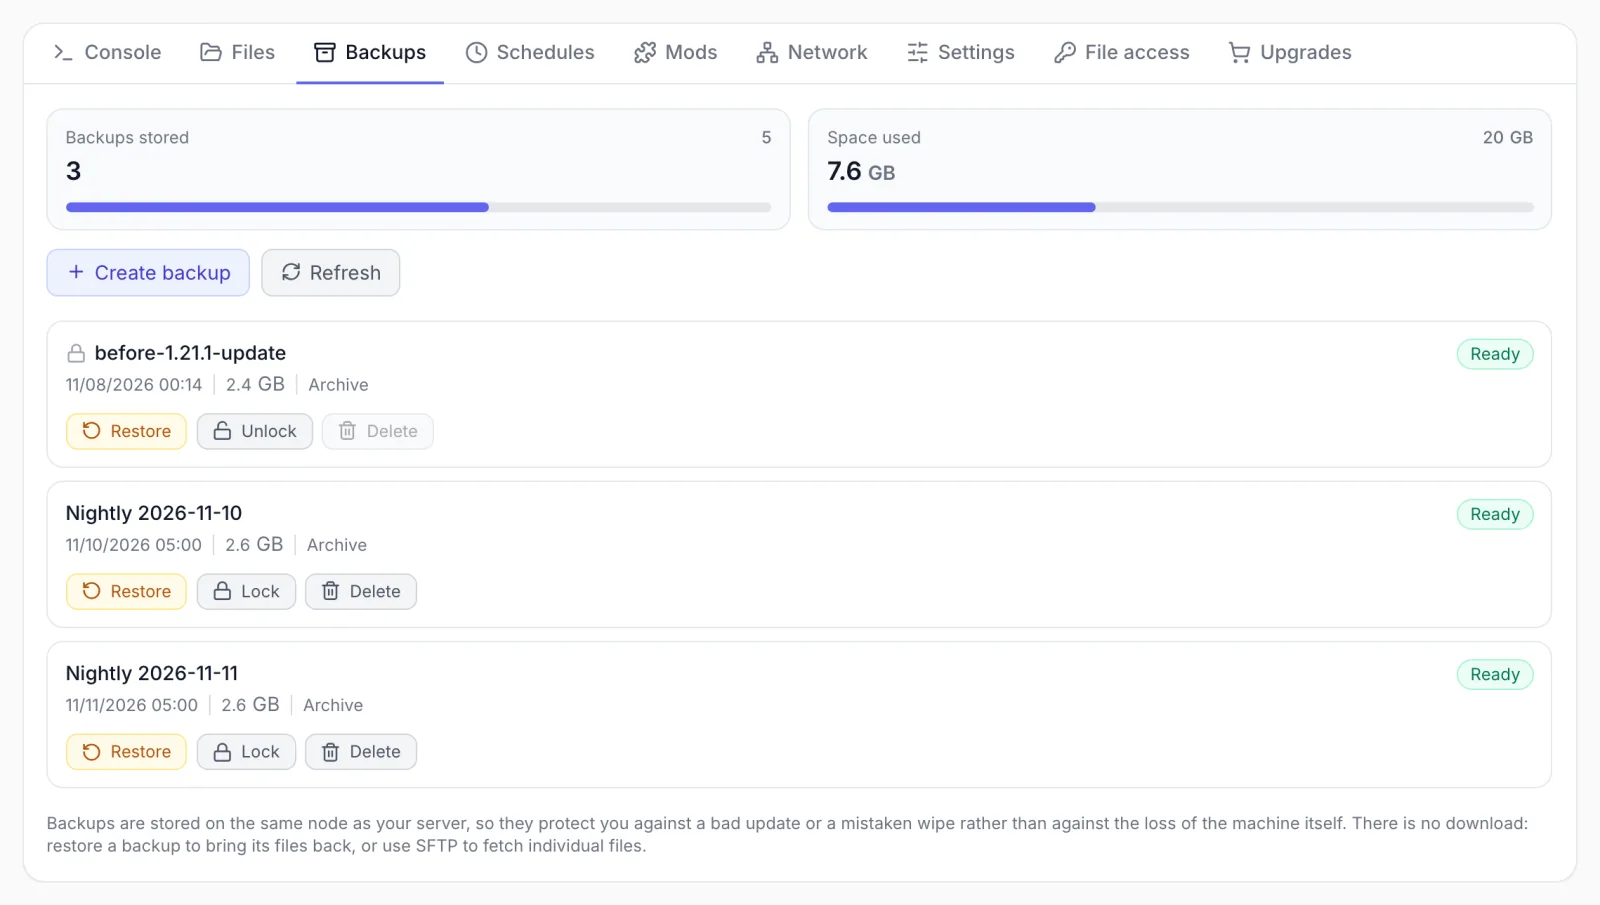
At the top, two gauges show what your plan allows:
- Backups stored: how many backups you have, against the number of slots your plan includes.
- Space used: how much space they take, against your plan's backup space (No limit if your plan has none).
Taking a backup
Click Create backup. The panel says “Backup started. It will appear as ready once your node has finished it.” Backups made from this button are named after the date and time they were taken, in UTC (for example Backup 2026-11-11 03:30 UTC). A backup moves through Queued and Backing up to Ready, or Failed. Click Refresh to update the list. Your host may also take backups on a timetable set in your plan.
Create backup is greyed out when:
- every backup slot is used: “You have used every backup slot your plan includes. Delete one to make room, or unlock one first if it is locked.”
- your backups fill the plan's backup space: “Your backups already fill the space your plan includes. Deleting a large one frees the most room; a bigger plan raises the limit.”
- a backup or restore is already running: “A backup job is already running on this server.”
Lock, delete and automatic clean-up
- Lock keeps a backup when older ones are cleared away. If you go over your plan's count or space, the oldest unlocked backups are removed automatically until you are back within both limits. Locked backups are never removed this way. Unlock allows a backup to be cleared away again.
- Delete asks you to confirm. A locked backup has to be unlocked first. The backup stays in the list, greyed out as Removing, until the server's machine confirms the files are gone, and only then is the space returned to your allowance.
Restoring a backup
- Click Restore on a backup that is Ready.
- Read the warning: everything on the server since this backup was taken will be lost, and this cannot be undone. The backup itself is kept.
- In Type the backup's name to confirm, type the backup's exact name. The copy button next to the label copies it for you.
- Optionally tick Delete the current files instead of keeping a copy (see below).
- Click Stop the server and restore. The panel says “Restore started. Your server is being stopped first.”
Normally your current files are moved aside while the backup is unpacked, so the server needs room for two copies of your world at once. If your plan does not have that much space free, tick Delete the current files instead of keeping a copy. Everything on the server is then deleted before the restore starts, and if the restore fails there is nothing left to put back. The option only appears when the machine your server runs on supports it.
Backups live next to your server. Backups are stored on the same machine as your server. They protect you against a bad update or a mistaken wipe, not against the loss of that machine. There is no download button for a whole backup: restore it, or use SFTP to fetch individual files. When a service ends, its backups are deleted after a period your host sets, locked ones included.
Schedules
The Schedules tab runs an action on your server on a repeating timetable, such as a nightly restart or a nightly backup.
Creating a schedule
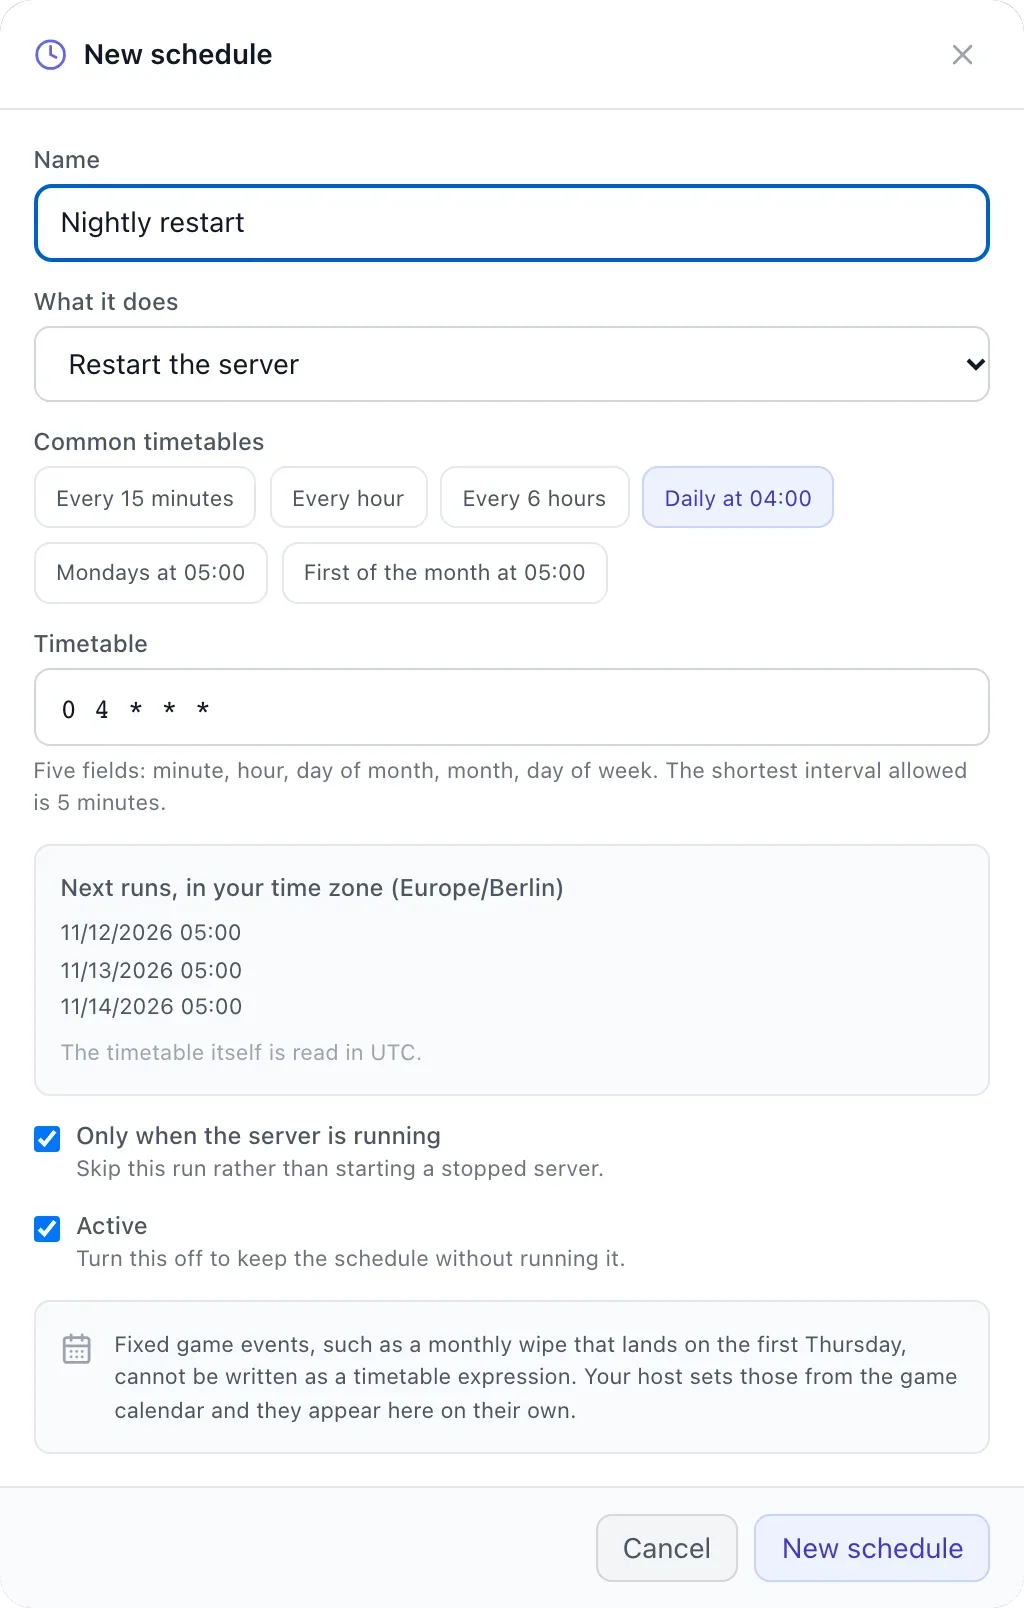
- Click New schedule.
- Enter a Name.
- Choose What it does: Start the server, Stop the server, Restart the server or Take a backup.
- Pick one of the Common timetables (Every 15 minutes, Every hour, Every 6 hours, Daily at 04:00, Mondays at 05:00, First of the month at 05:00), or type your own Timetable.
- Check the preview of the next runs, shown in your own time zone.
- Set the two switches, then click New schedule to save.
| Field | What it does |
|---|---|
| Name | Your label for the schedule. |
| What it does | The action to run. |
| Timetable | A standard five-field timetable: minute, hour, day of month, month, day of week. For example 0 4 * * * is every day at 04:00. Shorthands such as @daily are not accepted; write the five fields out. |
| Only when the server is running | Skips a run instead of starting a stopped server. |
| Active | Turn this off to keep the schedule without running it. |
Rules to know:
- Times are in UTC. The time you type is read in UTC, not your local time. The list and the preview show next runs in your own time zone next to it, so you can check before saving.
- Five minutes is the shortest interval. Schedules are checked every 5 minutes, so a run can start up to a few minutes after its set time. A timetable that would run more often than every 5 minutes is refused.
- Up to 25 schedules per server. At the limit, the panel says “You have reached the 25 schedules your plan allows. Delete one to add another.”
- The timetable is checked before you save. For example, “A timetable has five fields separated by spaces. This one has 4.” or “That date does not exist in any of the months you chose, so it would never run.”
Managing schedules
Each schedule shows its action, timetable, next run, last run, and the reason if its last run was skipped (for example “Skipped — your server was not up, and this schedule only runs when it is.”). The buttons on each row are:
- Run now runs the action straight away. The next scheduled run still happens as normal.
- Pause and Resume stop and restart a schedule without deleting it. A paused schedule is labelled Paused.
- The pencil icon edits the schedule (Edit schedule, then Save).
- The bin icon deletes it after you confirm. Anything it has already done is not undone.
Some games have fixed events, such as a monthly wipe on the first Thursday, which a timetable cannot express. Your host sets these up, and they appear in your list labelled From the game calendar. You cannot edit them here.
Mods
The Mods tab installs mods and plugins from the mod sources your host has enabled for your game. The server's machine downloads them directly; they never pass through your browser.
Installing from a mod source
- Pick a source from the buttons at the top, for example Modrinth, CurseForge, SpigotMC or Steam Workshop. You only see the sources your host has turned on.
- Type a name in Search for a mod by name. If the source offers them, narrow the results with Version and Loader, then click Search. Results are filtered to versions that work on your server.
- On a result, click Choose a version, then Install next to the version you want. The panel says “That has been queued. It runs on your server and may take a few minutes.”
- If your game only loads mods when it starts, restart the server.
Installed mods are listed with their source and status: Installing, Installed, Failed or Removed. To remove one, click its remove button and confirm. The file is deleted from your server; any world data the mod created is left alone. Restart your server for the change to take effect.
Adding a mod you downloaded yourself
Some mods cannot be downloaded automatically, for example because the author has switched off automatic downloads. To add one:
- Download the file from the mod's page.
- Upload it into your server's mods folder with the Files tab (up to 4 MiB) or SFTP.
- In the Mods tab, click Register an uploaded file, enter the File name only (for example
BigMod-1.2.3.jar, with no folder), and click Upload. The panel checks your server for the file and adds it to the list.
If the tab says “Your host has not enabled any mod source for this game yet”, there is nothing to search; ask your host.
Network
The Network tab shows the Connect address again and a table of Allocated ports. Each port is named (Game, Server query, Remote console, Voice chat or Extra port N) and shows its protocol: TCP, UDP or TCP and UDP. The main port is marked Main. When all ports share one address, the address is shown once above the table. Each row has a copy button for its address and port.
Settings
The Settings tab lists the game settings your host lets you see, such as the server name or difficulty. Which ones appear depends on the game.
- Edit a field, and Save changes and Discard buttons appear at the top. The panel then says “Your settings have been saved.”
- Saved values are used the next time the server starts, so restart the server to apply them.
- Settings your host has locked are shown greyed out for reference.
- Settings marked Sensitive (for example a password) are never shown back to you. Leave the field empty to keep the current value, type a new one to replace it, or click Clear to remove it when you save.
Sensitive is not secret from your server. Sensitive settings are stored on your server, so anyone you give access to it can read them, including over SFTP and in the console. Do not reuse a password you rely on elsewhere.
File access (SFTP)
The File access tab gives you the details for any SFTP client. SFTP is the right tool for large files, whole folders and bulk uploads.
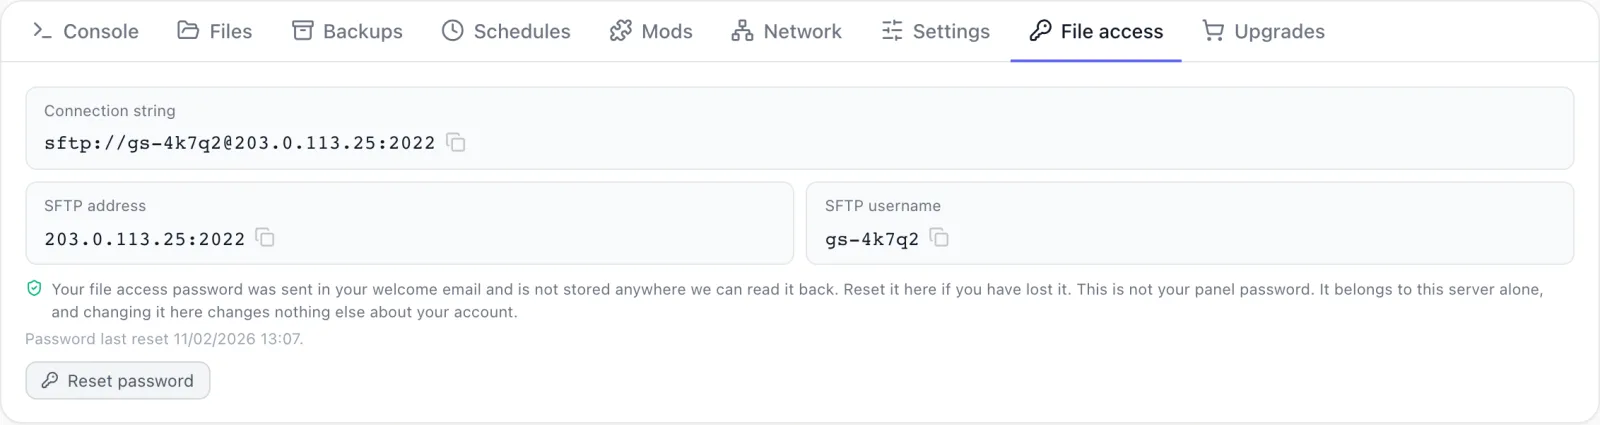
- Connection string: everything in one
sftp://line. - SFTP address: the host and port.
- SFTP username.
This password belongs to this server alone. It is not your panel password, and the panel cannot show it again because only a scrambled copy is kept. If you do not have it:
- Click Reset password.
- Read the warning: the old password stops working straight away, and anyone connected with it is disconnected, including tools that sync automatically.
- Click Reset it.
- Copy the new SFTP password now. It is shown once. Then click I have saved it.
The tab shows when the password was last reset. If it reads “File access is switched off for this server at the moment, so an SFTP client will be refused.”, contact your host.
Upgrades
The Upgrades tab lists the add-ons your host sells for this server, grouped under Resources, Players, Network, Backups, Support and Other. Typical add-ons are more memory, player slots, storage, extra ports, a dedicated address or more backup space. Each row shows the price per month or as a one-time fee, and how many you already have.
- If the add-on can be bought in quantity, choose How many.
- Click Add. There is no extra confirmation step.
- The panel adds the charge to a new invoice (or proforma, depending on your host's billing settings) and names it, for example “Added to INV-1234. Your server is upgraded as soon as it is paid.” Pay it from Invoices. A free add-on is applied straight away.
Memory, processor, disk and backup add-ons take effect without a restart. Rows marked “Takes effect after the next restart.” (such as player slots and extra ports) need a restart. A recurring add-on renews with the server on its billing cycle. At limit means you already hold as many as the add-on allows.
An add-on can be refused before any invoice is made, with a reason such as:
- a player-slot add-on that needs more memory than the server has: add memory first, then the slots;
- more than 32 extra ports on one server;
- no spare address on the machine for a dedicated address;
- an add-on you already have, or one at its per-server limit.
When a tab is locked
A tab that is not available right now shows a small lock. You can still click it to read why. The common reasons are:
| Message | What to do |
|---|---|
| This is unavailable while your service is suspended. Settle the outstanding invoice to bring it back. | Pay the overdue invoice. |
| Your server is still installing its files. This will be ready once it has finished. | Wait for the install to finish. |
| We cannot reach the machine your server runs on. We are already looking into it. | Wait, or contact your host if it lasts. |
| Your plan does not include this. Upgrading will add it. | For example, a plan with no backups. Ask your host for a plan that includes it. |
| Your host has not switched this on yet. Your server is fine; open a ticket if you were expecting to use it. | Open a ticket with your host. |
| The machine your server runs on is not accepting configuration changes at the moment. Your server keeps running and we are already on it. | Wait; your server keeps running. |
| This service has ended, so this is no longer available. | Nothing; the service is terminated. |
The Network, Settings, File access and Upgrades tabs never lock, so you can always see your ports and SFTP username. The controls inside them follow the same rules.
If your service is suspended
A suspended server is offline and its files are kept. Every tab that would change the server locks, and the power buttons disappear. The connect address is still shown, but you cannot copy it. Paying the outstanding invoice brings the server back with everything as you left it. If your host gave a reason, it is shown under Reason:.
Team members and permissions
If you share your account with a team (see Team members), each person's permissions decide what they can do on this page:
| Permission | Allows |
|---|---|
| View Services | Seeing the server, its files, backups, schedules, mods, ports and settings. |
| Manage Services | Changing files (including upload and download), creating, locking, deleting and restoring backups, creating and editing schedules, installing and removing mods, saving settings, resetting the SFTP password and buying add-ons. |
| Power Controls | Start, Stop, Restart, Force stop, and Run now on a schedule. |
| Console Access | Opening the console and typing commands. |
The account owner always has every permission.
Troubleshooting
- “We could not load this server”: the panel could not read the server's details just now. Nothing is wrong with your server. Click Try again.
- “That file is too large for the browser. Use SFTP for files this size.”: the file is over 4 MiB. Use SFTP.
- “The console reconnected several times and has stopped trying. Reload the page to start again.”: reload the page. If it keeps happening, the machine your server runs on may be unreachable.
- “The name you typed did not match this backup's name.”: when restoring, type the backup's name exactly, or use the copy button.
- “This backup is locked. Unlock it first if you want it deleted.”: click Unlock, then Delete.
- “That would run every N minutes. The shortest interval allowed is 5 minutes, because schedules are only checked that often.”: choose a less frequent timetable.
- “That version is built for a different mod loader than your server runs, so it would not load.” or “That version is not published for the game version your server runs”: choose another version of the mod.
- “The author of this mod has switched off automatic downloads”: download it yourself and use Register an uploaded file.
- Server status “Installation failed” or “Error”: open a ticket with your host (see Getting support).
- “Your server is on, but the game is not”: read the last lines in the Console. Common causes are a broken config file, a mod that does not fit the game version, or too little memory. Undo the last change or restore a backup, then Restart.
Hosts: the admin side of these servers is described in Game Servers, Game Plans and Game Settings.
Minecraft, CurseForge, Modrinth, SpigotMC, Steam and other names mentioned here are trademarks of their respective owners. FluxBilling is not affiliated with them.